Friday, December 23, 2005

Merry Xmas

Since you've been good all year, here is your Xmas present. Ive done quite a bit since my last update. I have been trying to finish the structure by Xmas. Im close, but I dont think I'll make it.

Ive built the stairwells, which you can see in yellow, and added a few other structural bits. Theres not much to go before I can start on the detail.

Im now working on integrating the green stairwell supports into the green interior shell. When thats done I will leave the stairs seperate, and they will form the base for the upper deck. That way I can hide the whole lot (stairs and upper deck) to work on the lower deck, or hide everything except the stairs and upper deck, to work on that.

Ive been hand optimising polys like crazy, as I go. By rights, it should be up to 2500 or so polygons, but its a lot less than that thanks to my re-organisation.

Poly count: 1990
File Version: 107 Posted by Picasa

Tuesday, December 20, 2005

Time Flies

They say "Time flies like the wind", but I say "Fruit Flys like banannas". This weekend has gone by really fast. I guess its because Ive been doing other things as well as working on the Tangara.

You may wonder why I tend to summaise the weekend's progress on Monday night (or Tuesday morning, which is usually the case). Its because I have a 3 day weekend. I dont work on Mondays, so to me, Monday night is when my weekend finishes, and by the time I get around to posting an update, its usually Tuesday morning.

Anyway, I have tweaked the window frames on the upper deck again. They fit a little better now, and the rest of my time has been spent working on the vestibule at the rear. From this angle, you can see the vestibule ceiling which I added just a few minutes ago. You can also almost see one of the vestibule seats. I have installed them as well. The floor is there too, but you cant see it from this angle. I considered posting a shot of just the interior, but given that Im deleting back facing planes to reduce poly count (meaning that you can see through the walls that normally wouldnt be seen from the viewing angle) its hard to get any spatial bearings for your eye to interpret the image. When Im working on the interior my eyes often play 3D tricks on me and turn the whole interior structure inside out. It takes me a few minutes to mentally flip it around so that it makes sense again - and I built it!. I imagine that many people looking at an interior only picture wouldnt be able to see it the right way around, so it wouldnt make any sense to them. With the outer body in place, you cant see much of the interior work that I have been doing, so thats not optimal either, but at least the image makes sense when you look at it.

Now that Im starting on the interior structure, I feel like it wont be too long before the model is finished, but dont get excited, there is still a lot of fine detail, scripting, and testing to be done once the model is finished, and I havnt even mentioned building the trailer yet.

Poly count: About 1800.
File version: 86 Posted by Picasa

Sunday, December 18, 2005

S Set Cab and Tangara Progress

Ive been working on the Tangara, but it doesnt look much different, so here are a couple of pics of the latest S Set Cab additions. The first is from the front. Any polys that cant be seen from the inside have been deleted, which is why you can see through the walls from this angle. As I mentioned earlier, I added the chair and fire extinguisher, from Auran samples. I also added the data logger and crew air conditining controls (probably the most important controls on the whole train). I have a few more bits and pieces to add (drivers door, for one) before Im ready to start on the controls and finer detail.

The second picture shows the view from the back, looking forward out through the front of the train. You can't see the ceiling in either shot, but its there. There will be multiple camera angles (if I can figure it out) for driver and guard, since due to the seperating wall, you wont see most of my hard work from the drivers view. There is a lot more work to do, and it will look much better than this when finished and textured. (Right now only the chair and extinguisher have any textures on them). I'll also be adding the glass, so dont panic, the windows will be included.

I cant bellieve how boxy and basic these cabs are, compared to the Tangara. You wouldnt want to be claustrophobic driving one of these!

Tangara
Ok, some basic Tangara news. I went to the ARHS Research room today. I thought they closed at 4pm, and arrived just before 3pm. They close at 3pm. doh! I had a few minutes and managed to grab a set of plans for the Tangara, but alas, no bogies. I have an alternate source for bogies plans that will hopefully come through soon, so its not a complete loss. I also grabbed the plans for the A8 type stations (1914 brick building, like the ones at Redfern, though technically they're modified A10's) The A8's are found on island platforms all over the network, so that is where I plan to start on the platform project, once I get some time. I browsed through the V Set plans, but there are so many variations I didnt have time to choose what I wanted. I'll go back to get those (and some other stuff) in the new year.

So anyway, back to the Tangara. Since the last picture I have added the window frames on both the upper and lower deck. I also spent a lot of time hand optimising the polygons, and managed to reduce the poly count by over 200!! It went down to around 1400 polys for a while there, until I added the window frames - then it went back up to 1680, but at least its not 1880! As Ive said before it will shoot up when I add the seats and other detail, but will be manageable. Thats about it really, the only visible difference is a few extra window frames - not enough to justify a screen shot, but a lot was done that wont be seen. Also now that I have the plans, I will have to spend some time adjusting various measurements by tiny amounts so that it is more accurate.

Gotta go. Enjoy. Posted by Picasa

Friday, December 16, 2005

A quick update

A quick update this time, to show tonights progress on the Tangara. Ive tweaked a few bits and cut out the windows and center panels on both the interior and exterior. The roof still has a few divits that need fixing after the cutting, but the guys in the panel shop tell me that they can sort that out fairly quickly :). A couple of days work on the body / interior and I should be able to start on the finer detail, such as the upper deck and upper, lower and vestibule seating. I also have a bit of detail to add to the drivers compartment, and I have to construct the gangway, and doors at the rear of the carriage. Hopefully I should have the structure finished by Xmas, and can start on the detail in the new year. Poly count is at around 1600. It will shoot up when I start adding the detail (think 96 seats) but Ive seen steam locos at 28000 polys in the forums, and this will be nowhere near that, when completed. Looking forward to my trip to ARHS on Saturday.

Thursday, December 15, 2005

Let there be light

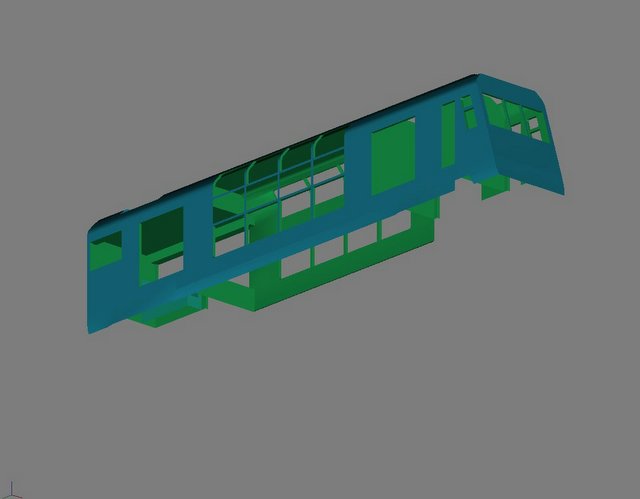
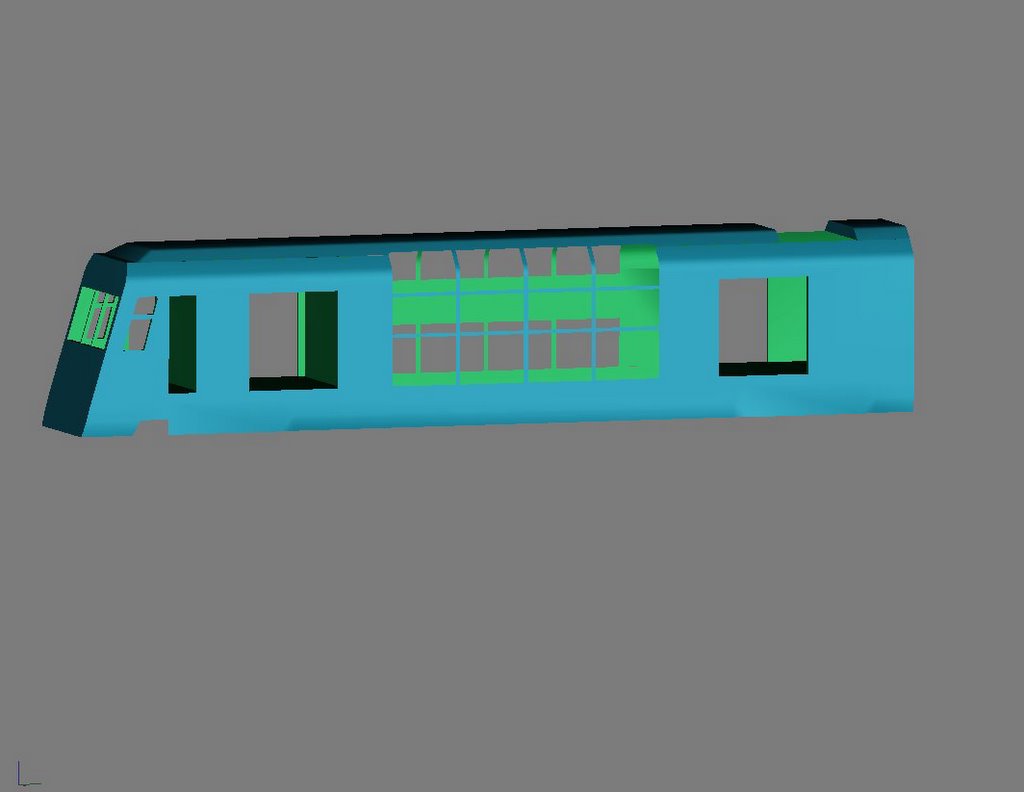
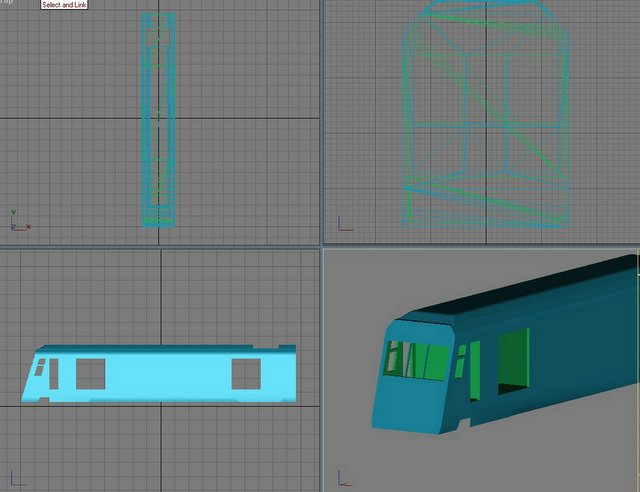
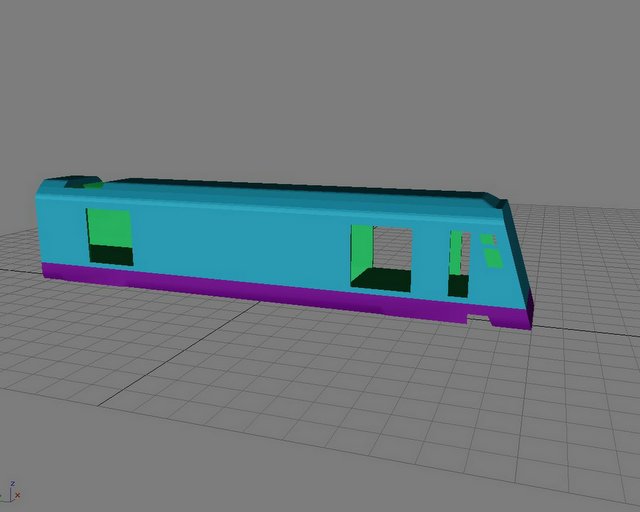
Ok, so this is really a bit of a tease. I spent a few hours tonight preparing to cut out the center windows of the Tangara. It took me ages to get each of the 12 windows and panels right. I started with a line marking the first window, converted it to an editable spline, and moved the verticies around a little. Then I made the other windows in the same row, and spent ages trying to get the size of the windows (and center panels) right, and then copied them for the other three rows. In the end, its pretty close, but not perfect without accurate measurements. Visually you shouldnt notice anything too strange, and if you do, I'll keep playing with it until you dont :)

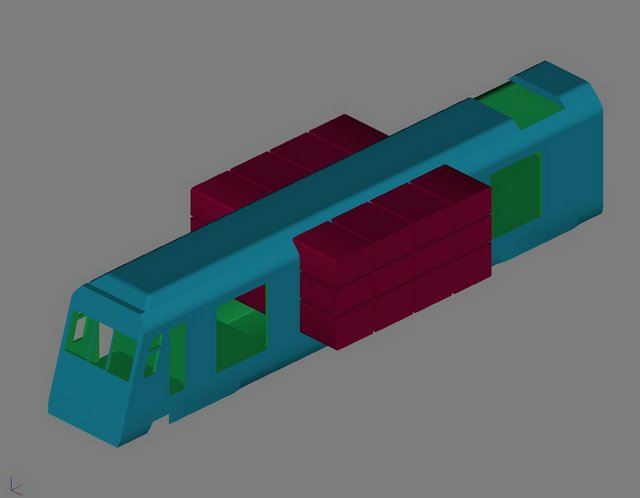
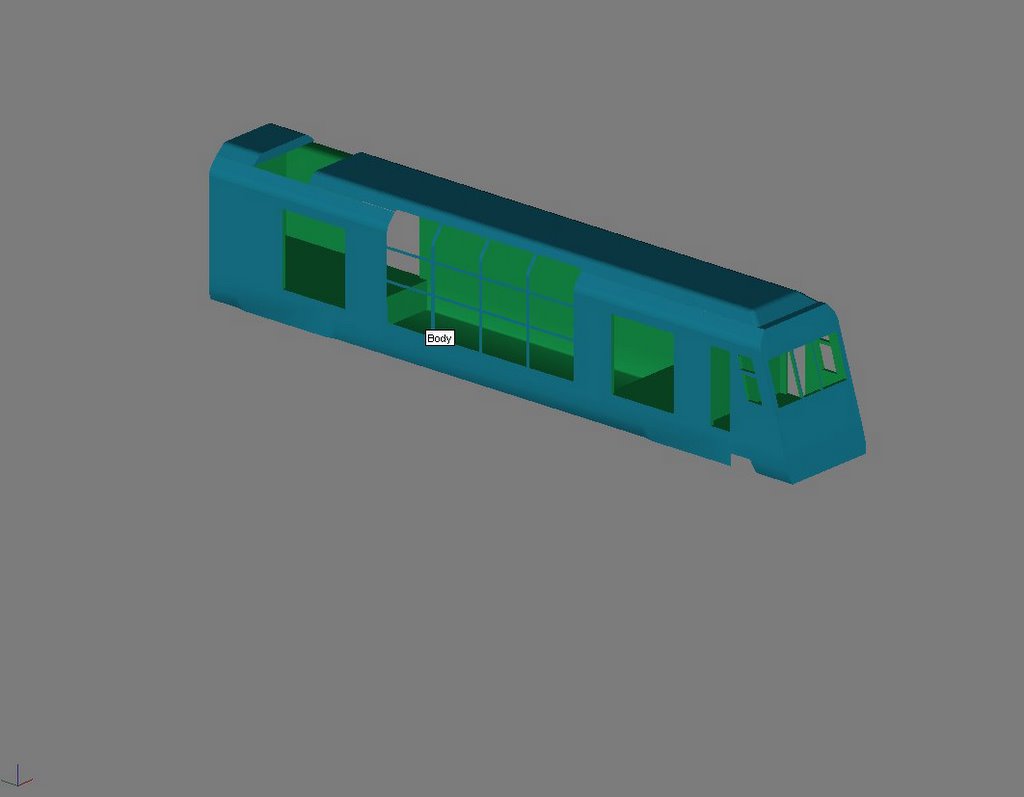
Once I had the splines in (almost) the right places I extruded them to make the large redish blocks shown above. These were then subtracted from the body to form the holes. It was about then that I noticed a few problems. Making the windows had caused a few polygons in the roof to dissapear, as verticies were created and removed around them. This is due to the roof always having been a seperate piece in the past. Now that it is attached to the body, there is a definite edge between them. You wouldnt see this in the finished model, but it means extra polygons. I need to go back and hand-optimize the roof so that both it and the body are one single piece with polygons shared between them, rather than hard edges.

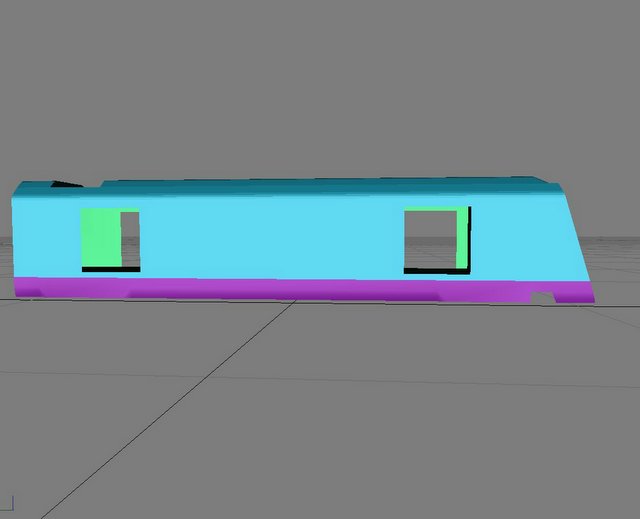
Once the body and roof are a single piece, I can go back and cut the windows again - Thats the tease. Ive backed up a couple of versions and im back to the seperate roof / no windows model, but I have all of my window blocks (including a few spares) so once I have fixed the mesh, cutting the windows out will be a snap, and with the polygons all in the right places, I wont have the problems that I had earlier. While Im doing this, the skirt has the same problem, though its not affected by the windows, but I may as well optimise it too (It will have to be done eventually). Overall, this will give a smoother finish and a few less polygons. The count really shoots up with the windows cut out, and thats not including the cuts needed for the interior windows (for looking out or through the carriage). Its still managable though.

S Set Cab
I did some more work on the S Set Cab yesterday. I'll post an updated picture soon. Ive been a busy boy. I added a few more pieces, Drivers chair, Fire Extinguisher (both from the Auran samples) as well as the data logger and crew air-con controls, and a basic dashboard panel (just the panel so far). Im still waiting on my research to arrive before I can start working on the dash properly. The only other things to do really are the Guards seat and Drivers door, before I can start on the finer detail like the hand brake and light fittings (I also have to texture it of course).

Textures
After playing around with textures and methods of texturing, I can see why a lot of Trainz objects have multiple texture files and Im starting to see where its helpful. I'll modifiy the method I have been using to include that technique, for various parts I will still use one large file (Things like the Tangara body (outside) would be one larger file). Im discovering what works, and what doesnt, as I go.
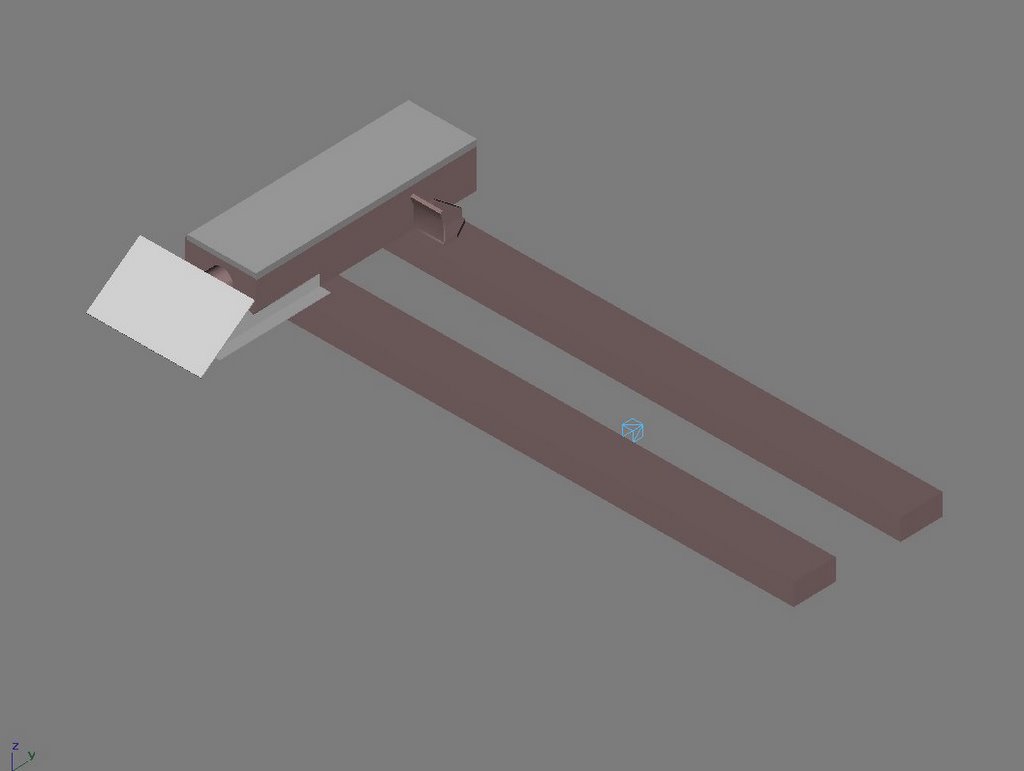
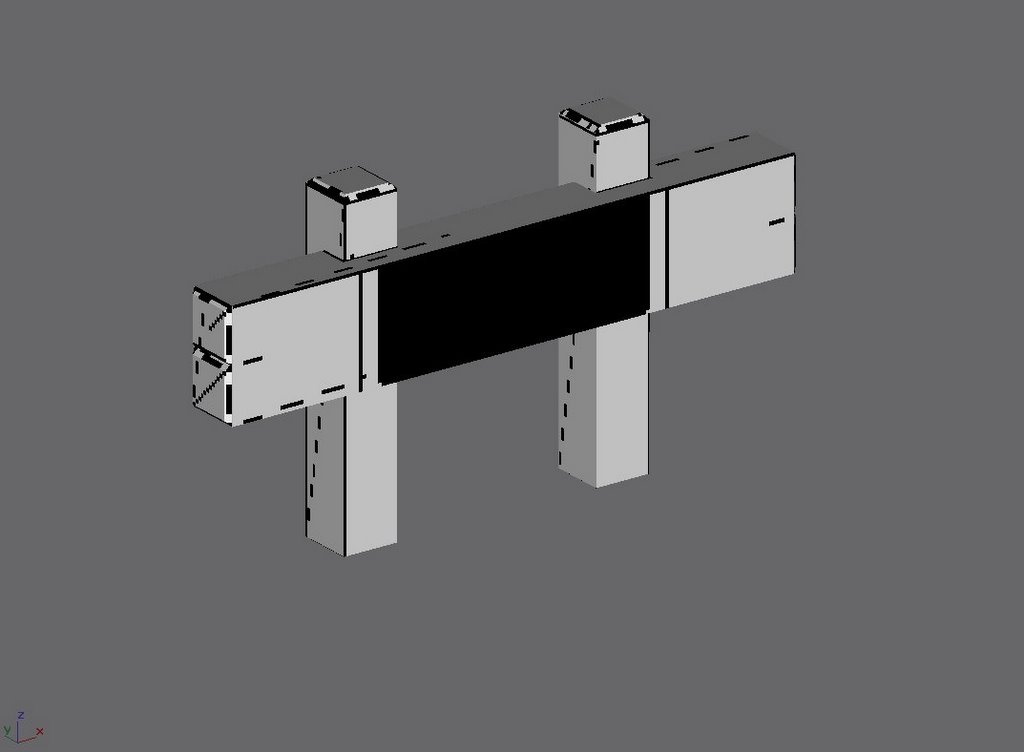
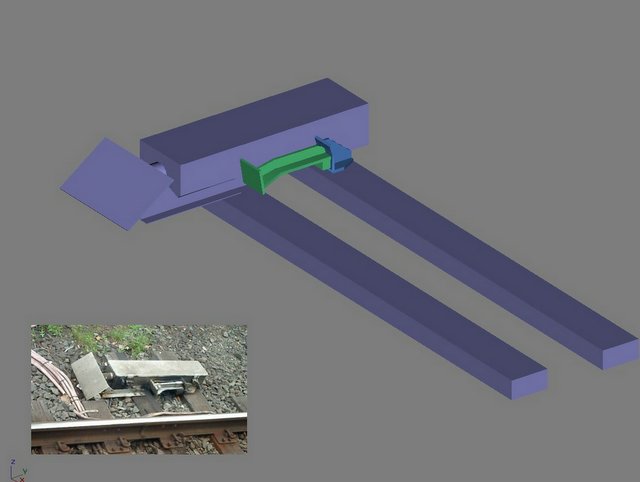
Platforms
I did a bit more research on platforms, both how to make them for Trainz, and looking for diagrams and details of the real thing on the net. Im planning on making a trip to the ARHS Research Center on Saturday (a mere 10 minute walk - lucky me!) and spending some real money on whatever useful material I can find. I have a list already of everything from stations to locomotives, and catenary (I havnt forgotten). Someone recently offered me some material covering platforms / stations, but it was in a large file. Ive been thinking about how best to deal with it. If you're reading this, I'll reply shortly.

Xmas break
Alas, its that time of the year again when everything shuts down for a few weeks. (Can you tell Im not a Xmas fan?) While I know I will keep working on things almost right up until Xmas, I also know that I will be taking some time off to spend with friends and family, and will get back to all of this some time in the new year. My wife has been very understanding of the hours (more hours than usual) that I have been spending at the computer in recent weeks. She deserves a bit of dedicated time in return. Im a geek, so Im always at a computer, but as I said, lately, its been more hours than usual. Xmas, and a few weeks after that, will be payback time.

Thats enough for now.

Tangara poly count: Was around 1500 before I backed-out. That included my cutting blocks and other non-model pieces. The body alone was 611. Posted by Picasa

Tuesday, December 13, 2005

Tangara Progress

I spent a fair bit of time this weekend moving verticies around. Tiny changes, sometimes just moving a point only a couple of millimeters. Ive been working mainly on the cab. I moved the side windows slightly, and cut out the holes for the front windows. I also cut out the panels below the windshield, and covered them over. This will allow me to texture them easier later.

I also spent a fair bit of time playing with Textures. I have been trying to create a texture set for the Buffer Stop that looks realistic, but although Ive been using graphics packages for years, Ive never really done a lot with layers and things like multiplying and subtracting layers. Im learning as I go. For the Buffer, I wanted to create a layer for the wood grain, and then put a layer over the top of that for the white paint, so that you can see the grain under the paint, as you can in the real world. I have also been playing with Specular Maps as I think they will help me achieve the effect that I am after, though I am not sure yet if Trainz supports them. I guess I should keep it simple, but if I simply texture it with a white paint job, it looks too flat, and kind of like it hasnt been textured at all (Trainz renders an untextured surface as white). I'll keep experimenting. It took a bit of time away from the Tangara, but you want me to get the Tangara textures right, dont you? This trial and error will help me in the longer term, and by the time I am ready to texture the Tangara, I will have already learnt a lot about texturing.

Part of my testing of the Buffer textures required me to load it up and see how Trainz rendered it. I created a config file (remembering to make it a signal) and exported the mesh and textures, and then used CMP to import it into Trainz. I set up a test track, with a few Sydney trains on it (Mainly the S and M sets, but also 81, 48, and 73 class locos) and placed a Buffer at either end.

At first it was a little small. I did the math again, and it seemed right, so I just visually scaled it until it fit on the track. Perhaps my memory of Sydney track gauge isnt what I thought it was. After scaling, I exported it again, and it looked great. Then it was time to play with the textures. I set up a layered image in Gimp (like Photoshop, but open source) and experimented. I found that when Trainz rendered the texture, it always looked a lot lighter than in Gimp - to the point that in my initial tests, you could not see the wood grain at all. A bit more experimenting and it looked ok, but not good enough for me to post a screen shot. I'll keep playing with it periodically until Im happy, and then I will build the second variation (style) that I am thinking of.

I should do a bit more on the S Set Cab. Hopefully I have some research material arriving soon, and I want to be ready for it. Speaking of research, I discovered today that the ARHS (Australian Railyway Historical Society) Research Center is just a few blocks from my house - no more than 10 minutes walk from here, so that will be very handy. I will have to check it out next weekend. Who knows what new projects I might find there to suck up even more of my time :)

Current poly count on the Tangara: 850
Posted by Picasa

Sunday, December 11, 2005

Textures are a pain

I spent last night mapping faces on the Train Stop to a texture file. I ended up with 34 faces, which to me seems like too many - especially considering they all map to the same file. Im wondering how Trainz handles that (will it keep 34 copies of the texture image in memory?). In the Flight Simulator world, the normal practice is to place all of the textures (diferent views of the plane) into one big file. That seems fairly normal to me, but the Trainz assets I have seen all seem to have multiple texture files with a few pieces in each one. The FlightSim way seems tidyer to me, so that is the approach I am taking initially.

The picture above is really rough. I threw together a basic texture image to get the mapping done. I did it a slightly different way, mapping all of the 34 faces to three different texture blocks within the file, rather than using LithUnwrap to map each face to a seperate region of the file. The picture is missing the animated trip lever, but you can see b.r.main, the small wireframe dummy that controls the animation. I will play around with the texture some more next time, but for now the hard part (the mapping) is done. I discovered a few components that will need to be mapped seperately if I want to add detail to them. I havnt mapped the trip lever yet.

Provided my wife doesnt want to drag me to the beach tomorrow or something, I should get some more done on the Tangara. Most of that time will probably be spent re-adjusting everything since Mikkk has provided some extra dimensions that I didnt have before. More work, but It has to be done.

Sleep is good.

Saturday, December 10, 2005

Computer Problems

1 Pm
Ugh! Computer problems really suck. My PC is still acting weird. Meanwhile, Ive been studying all I can about textures, and have finally found a method that works for me (Many havn't worked). Ive been trying it out on one of the Buffer Stops, since being bascially four chunks of wood, its simple and quick to build. I'll post a pic, and a bit more info, once my PC is working again. Im planning a photo-trip later today for a few more research pics.

7 Pm
I finally gave up on trying to enforce my will on my Windows PC and instead adjusted my expectations to match the reality. The PC (Both its BIOS and Windows) is now doing whatever the heck it wants, with the added emphasis that it is now at least doing something. In the end, I reverted back to its old BIOS. Windows finally co-operated after several failed reboot attempts, and came up properly. The most frustrating part is that the BIOS bug (which I am now thinking is a motherboard fault) causes a 10 minute delay during each reboot (and Ive done several today). for example, Try reversing out the new bios, flashing the backup ROM as well, and then booting windows (an attempt anyway), and theres 30 minutes of waiting time right there!

As noted above, I went for a walk earlier, after being frustrated by my PC. I took a few photos at Redfern and Central, and while I was at the Sydney Terminal part of Central, I stumbled upon the historic "Cockatoo Run" pulling in to Platform 1 after a tour, and took a few snaps of 4306 and 44211.

Anyway, due to my productive PC time being limited today to only a few minutes at a time, I have been playing with Gmax Textures and finally have a method that works. Im using Multi-Materials, and also using LithUnwrap to create the texture templates which I can simply repaint later.

The picture above is the Buffer that I have been working on, with a very rough test texture applied to it. The texture is currently the raw repaint master template created by LithUnwrap with about 30 seconds of work done to it to give it the black front.

While I was at Sydney Terminal I discovered some more detail which I need to apply (It wasnt apparent in the photos I was working from), so before I start setting it up to be tested in Trainz, I will have to go back and add the missing detail, then retexture it again. There will be two versions - a simple one similar to this which is often found at the end of the line (ie: Nowra), and the Sydney Terminal style with their "feet" and lights. (You''ll understand the "feet"thing when I post a pic of one).

I finally figured out why I havnt seen a lot of my wife recently. Apparently she moved out a couple of weeks ago due to my spending so much time at the computer recently. I hadn't noticed, though it has been a bit quieter lately.

Im kidding. She's due home in an hour, so I had better make the most of the remaining time.

I should be getting back to the Tangara tomorrow. I know thats what you are really waiting for.

Thursday, December 08, 2005

Train Stop

Ok, so here is the pic of the Train Stop that I wanted to post yesterday. Windows finally finished resyncing the RAID array, and now I can access my drives again.

I have a little bit to finish, and then its off to the texture factory for a coat of paint. Then after a brief stop at the scripting works, it should be ready for testing. Its animated, and will follow the signal its attached to.

Its great having little things like this one to do. It breaks up the monotony. Ive been staring at the Tangara for days now, every little moment of spare time I get. Having small projects like this one allow me to step back and focus on something else for a while. The catenary will be my relief when this one is finished, and then when thats done, I have another small project (a couple of buffer stops) that I can switch to.

The main buffer will be the big wooden type, like those seen at Sydney Terminal. Constructed with 9 inch square posts, (Basically 2 sleepers together) they are fairly solid. There is also one at the north eastern corner of Central Electric, and a slightly simpler version at Bomaderry (Norwa). Im planning to do both types.

Time is the biggest problem. I keep announcing my ideas here, and adding things to the list, knowing that it will be months before some of them see the light of day. I guess I just have to keep at it.

But right now... I have some real work to do. Posted by Picasa

Wednesday, December 07, 2005

A real Tangara

Here's a picture of a real Tangara. Im having some computer problems, and without boring you with all the details, Windows Software Raid really sucks when its resyncing the mirror. Thats going to take a few more hours, and while its doing that, my disk performance is pretty bad. I can access folders, but if I try to access the drive (as a whole) the system just locks up. That means I cant save any screen shots because when Gimp tries to build its list of drives and folders for me to save to, it locks up too. Compare this to my Linux boxes, and I never really even notice EVMS when its syncing multiple mirrors at the same time!!

Gmax is working fine, except that periodically the whole computer freezes for a few seconds, which is driving me crazy. Hopefully all will be well again tomorrow, after the resync is finished. Then I just have to fix the Bios problem... ugh!

Im taking a break from the Tangara and have been working on the Train Stop. I wanted to upload a screenshot. The model is almost ready for texturing. There is just a little more to do first. So far its 190 polys. I should be able to finish the model fairly soon, then I just have to build the config file, write a script for it, and finally test it out in Trainz. After testing (and tweaking) I can upload it and then I will finally be a DLS contributor, and get the little flag in the forums. Yay! :) Posted by Picasa

Monday, December 05, 2005

Engineers Rock!

Here is the latest pic of the Tangara. I got bored doing the structural stuff that Ive been working on for a while now, so I started playing with some fun bits. I added some doors and animated them. So far its just the one set, but the principle will be applied to the other three. There is a long way to go. the animation works in Gmax, but will have to be scripted to work properly in Trainz.

I found some station platforms recently, which are fully set up, but not exactly the Cityrail type. Im considering converting them and integrating some of their features into the Tangara. I have to read the license first, to see if I can, but even if I cant modify them directly, I know how to do it myself now. They wouldnt be a requirement, but there is some good potential there for realism.

The picture above also shows the right hand side, with the completed skirt that I mentioned earlier, and is a change from the usual left side shots I have been posting. The roof and other pieces are hidden from the picture.

Its starting to remind me of photos that I have seen of Tangara's at MainTrain, with their doors open or even removed, and various other pieces missing during maintenance. I guess that means its starting to come together.

Engineers
Thank god for decent engineers! I dont have a lot of reference material for this project. Im working mainly from the info on the Cityrail Fleet pages, photos, and the ability to just take a short walk and ride on one, whenever I need to. Most of the time Im modelling visually, as the only measurements I have are the overall dimensions on those pages. This is where the engineers who desinged the Tangara have been very helpful. Things just fit! Ive been placing peices roughly where I think they "look right". I might end up with an item being, say 2.234 metres from the center point, or "örigin". Then I think to myself: "Ok, If I was en engineer, what would that measurement really be?", and I'll move it 34 milimeters to 2.2 metres. Im finding that dependent components surrounding the one Im focused on just fit into place around it, as they should.

For example: After having made the doors and fitted them into the door frame, I noticed a gap. The frame, which I did visually was a little too wide, so I did the excercise above for each corner of the door frame - Where should this corner be?. When I was done and the doors fitted the frame properly, I found that the center of the door frame was located at exactly 5 metres from the origin! Doh! Why didnt I think of that. There is a mathematically harmony at work here, and Im appreciating it more and more.

Current polys: About 650

Note: The poly count is an estimate because I have to subtract the polys used by my guides and temporary 'jigs' used to build a part, but which are not part of the actual model, and will be deleted later.

No time for Trainz anymore

Now that I've committed myself to building the Tangara, I dont have time to actually play with Trainz or build a route anymore :( Gmax sure is a time consumer, but it will be worth it in the end.

I've cut out the doors and side windows for the drivers cabin and connected a few places that needed a surface. Most of this is being built with planes, which are one-way, meaning if you look at them from the back, you can't see them, so when you build a wall, you have to build both sides and fill the top and bottom gaps. Thats a basic example. Yes, I am using boxes where they are appropriate. The lower deck is a box with the top cut off, making it into five planes - see what I mean?

I also built a basic two-seater Tangara seat as an experiment. It turned out ok, but might be a bit small. I can scale it later.

You might have noticed that I changed the template for this page. I spent a bit of time tweaking it, and you will see a list of projects on the right. More needs to be done to finish the template, and that will happen over time. I also reorganised the forum banner, as I found that it wasn't showing up half of the time. Its now on my own web server, and seems to be working. While I was working on the new template, I also changed the name and URL of this site. The banner points to the new URL - you seem to have found it ok.

Mikkk asked me if I could do some South Coast style overhead wire, so that was added to the list. I'll start on that when I get some photos - either from Mikkk, or if I happen to be out and in the right place. I'll start on the single pole, and probably also do a double. Any others will be by request. I joined the AusTrainz mailing list and had a look at their wish list. I'll see what I can do.

I will probably do a little more work on the S Set cab soon, I'll post updates as it progresses. I should really do some more on the Train Stop, as that is the simplest of all, and would probably get me a DLS Contributor flag faster... that is if CMP will let me upload it... Im in no rush.

Current Poly count on the Tangara: About 570 Posted by Picasa

Sunday, December 04, 2005

Redfern Workshopz


I put a banner together to use in the forums. Its true, Im new to Trainz, and I havn't uploaded any content yet, but as they say good things are worth the wait. Im a geek, and I pick up new stuff fast. Ive only been using Gmax a few weeks, and Im progressing well. Ive read the Content Creation Guide and it makes sense and I understand the key concepts, and know what I need to do to build models that will work, and work as I have promised below.

Trainz is a great program, and if we all get together and fill it with some good content, we all win. Im concentrating on my corner of the world, and I plan to see it through, over time. The banner is to show that Im serious about that.

There is (or was) a huge group of people who were inspired enough to start building almost the whole Sydney Cityrail network. Alas one by one they seem to have found other interests, many of them (according to forum posts) frustrated by the lack of suitable Sydney or NSW content, which they needed to model our rail network. The guys from Cardiff Workshops have been a tremendous help, giving us some high quality local content, but more can be done. Hopefully as more NSW based assets are created, some of the Cityrail route creators may return and complete what they have started.

About the name
Sydney's electric suburban passenger network began in the early 1900's. As the railway grew, a large workshop sprang up at Eveleigh, in the inner city, and the existing Redfern platorm (it wasnt even a station at that stage) was relocated from where the Eveleigh workshops are now, to its present location. The original electric passenger trains, affectionately known later in life as "Red Rattlers" were built during the 20's and 30's in the Redfern Suburban Carriage Workshops, a part of the Eveleigh Workshops, located on the other side of the line, near the present Redfern Station.

Sadly the Redfern workshops were closed many years ago, and are now just derelict buildings. There are plans to redevelop the site and we may lose the heritage value of the buildings. The Eveleigh workshops across the line are still operating, though at a greatly reduced capacity. They are currently used to house and prepare the Milenium Train, and Endevour Explorers. A small section at Eveleigh houses 3801, the most well known heritage steam locomotive in NSW, which is still running tour trains from time to time (See the photo in the archive). Eveleigh is a shadow of its former self, and large sections have already been redeveloped. With the rise in price of inner city land, its only a matter of time until it is closed forever. That may happen sooner than we think as Railcorp have indicated that they will not be renewing the operators lease of 3801, when it expires next year. The future of the locomotive, and the facilities to maintain it at Eveleigh are in doubt.

All of this is just down the road from me, so when I was thinking of a name to tag my Trainz content creations with, living in Redfern, it was only natural to call it Redfern Workshopz.

Blah. I type too much, and I still didnt say half of what I was going to.

Saturday, December 03, 2005

Half a skirt is better than none

Its almost 8am. Here is a side on shot so you can see the skirt beginning to take shape. Notice the flattened areas over the wheels. This is the fruits of last night's labour. The MSTS models I've seen screenshots of dont have those! Ha! :)

I've only done the side that you can see, and when its a bit more finished, I'll make a copy and flip it over to the other side. Doing it that way means I dont have to do all the fiddly stuff twice, and the two sides will be a mirror image of each other.

I spent a lot of time browsing forums and searching for some Gmax tricks to make it easier. It paid off. Not only did I find the technique I used on part of the skirt, but I also found some very useful goodies in source form, which I can use later. I've always planned for my Tangara to have all the features I would expect to see as a downloader, such as lights, animation, a driver, working cab, visible passengers etc, and these finds will save me heaps of time later, not having to create a lot of things from scratch. I have also got to build the trailer, but that will be based heavily on this model, as will the G sets (Outer Suburban Tangara).

This is probably a good time to warn you that the Tangara will be for TRS2006 - at least as it will be released. If someone can make it work in TRS2004, thats great, but since I dont have TRS2004, I'll be building it for what I do have.

Having said that, I am using the TRS2004 Content Creators Guide as a reference, until the kind folk at Auran release the new version, so it will probably work with TRS2004. This will definately be Freeware, but I'm aiming for low poly, high quality, and am seriously considering Payware releases in the future. Its a lot of work to build one of these, and the hours I spend at the computer put a strain on the relationship with my wife, who also needs my attention sometimes.

Current Poly Count: Around 320. Posted by Picasa

Friday, December 02, 2005

Lessons learned in Gmax #1

Theres is no spoon. A few times in Gmax, Ive noticed something strange, maybe an edge will flicker when I rotate the viewport, or sometimes I will see a vertex through the back of a plane, but it doesnt seem to be attached to anything, even if I rotate around to the other side of the plane so that the normals are facing me.

Each time something weird like this happens, Ive found that its a problem. The flickering edge turned out to be two edges where there should only have been one, with a small gap between them. I had missed a weld somewhere. I didnt find it at the time, but I did find it later. The unattached vertex turned out to be the pointy end of a long face on a plane so unless I looked at it from just the right angle I couldnt see it. Once I knew which face it was connected to, I quickly moved the vertex back into place and welded it.

Often you just ignore little things like these that you see on the screen, and put it down to a glitch or a power flicker. Ive found that in Gmax there is no such thing and all artifacts need to be looked at carefully.

Here's a progress shot of the Tangara. Im still working on the interior. Tonight was mostly about moving verticies and getting everything in the right locations, lots of welding, and a couple of bulkheads. It doesnt look ike much has changed, but I saved at least ten times this session, so quite a lot has changed - just in a visually very small way.

I have to redo the base next so I can start on the lower deck flooring.

Currently around 285 polys. Posted by Picasa