Friday, March 31, 2006

Sun sets on Melbourne's 4D

Seen here enjoying its last sunset, the 4D was finally scrapped yesterday.

Despite the secrecy several photographers turned out, and posted their photos online almost immediately. A friend in Melbourne emailed me several links as they appeared, on various discussion groups, and it was almost like watching it happen.

You'll find the best pictures here, here, and here.

On the up-side, I now have more photos to use as reference, and now have the 4D covered from every angle (including shedding some light on a few Tangara mysteries)

Its sad to see it go, and it will be missed, but I will do my best to reproduce it in Trainz, even more accurately now than I had originally planned (since I now have better photos to work from). Posted by Picasa

Monday, March 27, 2006

Tangara Progress

One good post deserves another - Many thanks to whoever left the comment about the digital ampmeter. That little piece of info reduced the number of animation frames required down to 50 - a much more managable number. I hadnt begun to think about how to build the ampmeter, but now it will be easier than the speedo.

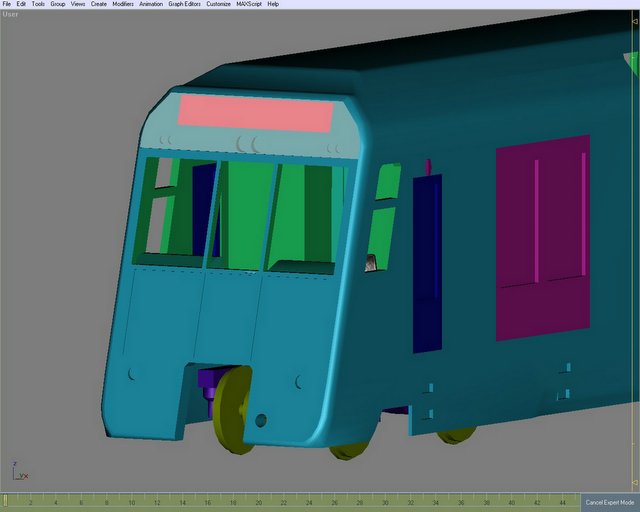
Ive pretty much finished the front end detail on the base model, except for the coupler and train-stop trip. Since there are no textures yet I highlighted the destination board so that it could be seen. That whole header area is behind glass, which for now I simulated by making the glass object see through in Gmax. I still havnt put glass in the windows yet. All of the attachment points for the various lights are in place, but hidden in the picture.

Hmmm. The cab side doors seem to a be seperate pieces to the body. Perhaps they'll be animated. I sure hope so - that will depend on me figuring out how to pass messages between the script that controls the exterior and the one that controls the interior. Its not that hard, just a matter of getting the code right.

I started putting the exterior script together. The one for the Control Trailer will be more complex than the one for the Motor Carriage, so its a good place to start. Im currently working on melding all of the "Stage 1" features together, and will consider the more advanced stuff when that is done. Due to the amount of time it will take to get all of the features in my head working, I think I will release it in stages as well, rather than waiting until its all done, That way I will have more time to work out some of the more complex scripting.

I finally figured out an easy way to keep that front end flat, and since then I have been working mostly on the Tangara, alternating between the model and the script. Ive spent some time researching and coding, and its coming along slowly.

The next step is to work on the rear end detail, and gangway, and then the exterior will be just about done, then it will be back to the Interior for the cab details and creating the interior model to be used in Cab View.

I guess I should have captured that screenshot with the passenger side doors open.

File Version: 303
Current Polys: 10,100 (excl bogies)

I underestimated the polys required by the exterior detail and have crept a little above my self-imposed limit of 10,000. Im now conciously aware of every new poly that I create. I'll go over it soon and see if I cant remove a few, and there are not too many more to be added. Posted by Picasa

Saturday, March 25, 2006

Going Digital

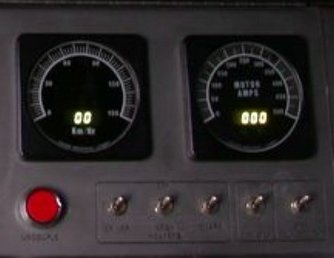
Whoever desgined the cab controls in Trainz, was clearly thinking of old fashioned analog gauges and toggle switches. Its dead simple to build a cab with these types of controls. Unfortunately our Tangara is a modern train, which uses digital displays and a lot of big round push buttons (as well as some toggle switches).

Trainz doesnt handle these well, and requires you to think of ways to make it do things that it was not actually designed for.

Well, Im excited. After a couple of weeks thinking about the problem, and several hours spent reading through old forum posts, the Content Creators Guide, and trying out a few ideas in Gmax, I think Ive finally cracked it. In theory anyway... I havnt tested my ideas in Trainz yet.

We know digital gauges can be done. There is an excellent range of payware locomotives that have them. Its just a question of how. I also got a hint from eldavo on how a big red push button might work in Trainz, and I will be trying that out soon(tm).

Essentially the gauges here are an analog/digital combo. The analog part is easy. The digtal part will require some work. Its basically animation - 150 hand built key frames (in the case of the speedo) Doh!!

That sounded hard until I realised the Ampmeter reads from 0 to 500! Doh!! Doh!! Doh!! I may cheat a little on the Ampmeter.

Getting them to work will requre some scripting, and I have been thinking about that too. The script for the Tangara control trailer is currently being built in my head, and its HUGE!. Hopefully in a few weeks, I can move it on to my computer, and free up some brain-space :)

Im also thinking of ways to make the TMS (Train Management System) computer work (or at least, appear to) and that thought process is coming along nicely - it will probably be done by texture replacement, like the external livery will (hopefully) be. I have a few other ideas brewing, and some of those will be a surprise (presuming they work).

For now, Im not planning on creating any ground-breaking technology such as refueling locos, coupling / air hose systems, or dynamic texturing libraries, and the like, (we all know the ones Im talking about)... but I do want to bring all of the existing (mostly seperate) features that we know about, together in order to bring the Tangara to life.

For example, the Tangara has (as most trains do) headlights and marker lights. It would be remiss of me not to script them, since we all know that this can be done and the scripts are available. We look forward to finding this feature in a new download. In fact, for me at least, it can be quite disapointing to download a nice looking locomotive, only to find that it doesnt have even basic features such as this. It all adds to the realism.

My wife already tells me the untextured static Gmax model "looks real" on occasion.

Bit I digress... Im not intentionally trying to build the hype around the proposed Tangara features, Im just sharing my thoughts. Its actually rather frustrating knowing that Im "this close" to starting to script all of the features together. The ideas are racing through my mind. It would be so nice to get it over with and move on, but that is probably a couple of months away, at least.

Im sure the wait will be worth it. Im also hoping that Auran will release SP1 soon, as part of the scripting requires a fix to the 2k6 decouple bug, so while we wait on that, I can continue to refine the Tangara. If it gets to the point where the Tangara is done, and SP1 is still pending, I'll work around it somehow.

No progress report as such (perhaps tomorrow) but the front end detail is almost done. The file version is up to 297, and Im thinking about starting on the rear end detail.

Actually.. I recently figured out that each file version represents about 30 mins to an hour's work (possibly more) so that may give you an idea of how much goes into one of these (and I still have the motor carriage to go, and at least 6 different versions of each to cover all of the feature / physical differences between the 3 types of Tangara sets that Im building) Posted by Picasa

Saturday, March 18, 2006

Tangara Progress

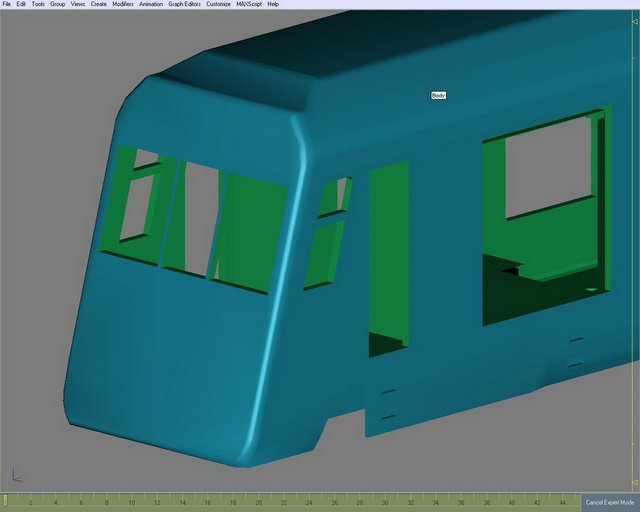
This is without a doubt why I have been working on the 86 class a lot recently. Arrrgh! Those curved edges were frustrating!!

It was almost impossible to make the curved edge (all the way around) while keeping the front surface flat. A vertex even being out by only half a millimeter caused the uneven surface to reflect light in strange ways.

Due to the windows being cut out already, there are a lot of verticies on that front panel, and every time I chamfered the edges, they would move. I wish I had saved a screenshot of the bent front end so you could compare.

Finally I detached the front end from the rest of the model and cut it in half to reduce the area that I had to deal with. I set up a mirrored instance to complete the other half, so that any changes that I made one side, automatically happened on the other side too, and then I went around, vertex by vertex lining things up. I chamfered the edges one at a time (Each chamfer makes a new edge, there were four edges by the time I was done) and adjusted the verticies again after each chamfer. Finally I re-attached the front to the body, and welded everything together. A couple of tweaks later, and it looked like the picture.

I just hope it all holds together when I cut out the remaining holes (the one around the coupler is the big one).

So basically this week, a lot of time spent, but not a lot of progress. Still, its movement, and any forward movement is a good thing. You may notice a theme between this and the previous post. I guess the lesson to be learned is to cut out the holes LAST!! :)

The poly count is creeping up. My original estimate was around 8000. Im actively reducing polys as I go, and will try to keep it as low as possible. I also have to remember to move the cursor out of the way when I take the screen shots, to avoid getting tool-tips in the picture. Doh!

File Version: 276
Poly Count: 9200 (Excl bogies)

Thanks for the comments on the previous post. Its nice to know my work is on-target and is also being appreciated.

Posted by Picasa

86 Class Progress

Well, I had planned to build this later, but since I have started it, I guess I should post progress reports.

Sometimes you just have to do certain things. Building the 86 class is kind of like that. I know I have other things that people are waiting on, such as the V Sets, but I cant just build things for other people - sometimes I just have to build things for me too, and this is one of those things. The V Sets should be the next to be started.

As I said before, im building half of the 86 class, and will be mirroring the other half. There are a couple of small differences between the ends, which I will tweak after mirroring, so as to retain the seperate No. 1 End and No. 2 End look and feel.

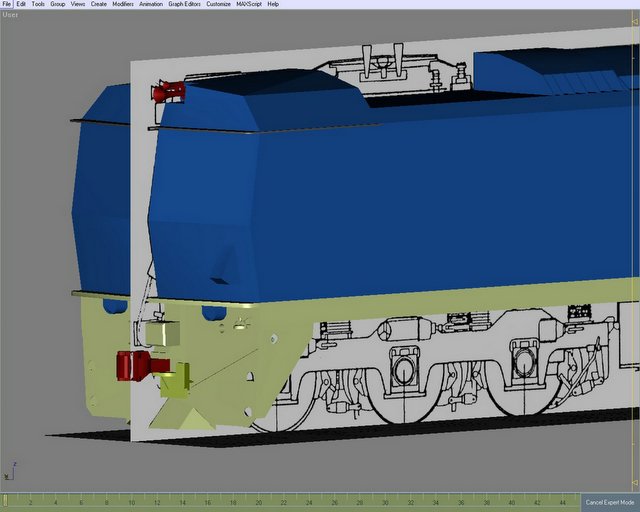
I have been concentrating on the yellow base and the end plate, and have just finished the Multiple Unit receptacles on this side. I still have to build the one on the other side which takes the cable from the other unit. I will be adding the cable later when I do the air hoses.

It took me a little while to get the "Roo Scoop" right, and properly integrated into the plate. (Hey, Im not an civil engineer, so I'll call the parts what I like :). The problem was that due to the foot-holes already being cut out there were a lot of verticies and faces to deal with... but its done now.

As you can see, my drawing has a lot of detail, especially for the bogies (which is unusual), but the one thing it doesnt have are dimensions. Luckily, I know the overall dimensions, and have a pocket calculator handy to work out the rest. The pantograph on the drawing, isnt very detailed but we have a few spares of the same type of pantograph at the HET workshops, so if I need some up close and personal detail, I have it covered, The 86 class also used another type of panto, similar to that on the Tangara model, so I guess I'll be borrowing from that one as well. I think these alternate pantos were field repacements.

The next moves from here will be to finish the end plate detail, and then think about cutting out the interior and windows / doors etc.

File Version: 41
Poly Count: 4200 Posted by Picasa