Someone once said: Life is what happens while we are busy making other plans
You will have read below that after 7 months I needed to get away from 3D modelling for a while - which I did. I started to get back into it, but a lot has been hapenning in my life recently, and on top of that, once I stopped modelling for a while, I started noticing all those other things that I had been ignoring for 7 months.
I desperately want to finish the Tangara and other Trainz related stuff that I am working on, but right now my life seems too cluttered to really get much of anything done, so I have decided to clear away the clutter by restructuring all of the various projects that I am working on - Trainz and non-Trainz related. This will make things a bit simpler for me.
Im currently reorganising my blogs so that I can move some content out of one into another, and use the first one for its original purpose. The new one can continue to accumulate all the stuff thats been going into the original one recently. This wont affect this blog, or you guys - its just something else that I have on the side. Once the blogs are reorganised, I will post links to them here, for those that may be interested.
I also run my own web server, and have around 6 computers here which are always online. A couple of them need their software updated to more recent versions, and I have been doing that over the last couple of weeks. These machines support everything that I do online in one way or another, so its important to keep them working. This is one of those things I had been ignoring.
Once that is done, I plan to set up my own Redfern Workshopz web site, as well as a couple more for other projects. Once all that is done, things should be set up a bit better, and up to date, so it wont need so much attention in the future. I really need to get those web sites online for my own sanity, as they are the key to a lot of the recent turbulence in my life.
I think about the Tangara every day - really!, and will try to get it moving again as soon as I can - I just have a lot of other things on my todo list at the moment.
I'll keep you posted.
Sunday, September 03, 2006
Monday, August 14, 2006
A quick one about comments
I found a couple of old comments from May that somehow did not get published, so I published them today. I dont know if Blogger sends an email to posters when comments are published or rejected (to those non-anonymous ones whose email address is known), but if it does, that would be why a couple of you might have gotten emails today.
To answer a couple of questions in those comments, yes, Im doing the T set, and the G set and also Melbourne's Tangara test train, the 4D. I think I recall answering that one before. Yes, Im also doing a trailer - in fact there will be 9 carriages all together to cover the variations of the three trains. The other models will be created once the control car model is finalised, to take advantage of it having already been textured and set up for export.
I got a couple of comments on the previous post about Central Station's 100th Birthday, but I decided not to publish one anonymous comment which contained some names and details. I was trying to make the article a little generic, and avoided naming names where possible. To Dave, I'll just say thanks for the comment, and that I try to make my own mind up on things, and often that means listening to several different versions of the same story and then deciding which one sounds more reasonable. I still havnt quite heard all the versions yet, so it may have been premature of me to give my opinion. I think the issue with the drivers may have been more clerical than availability. I dont often see Barry, as we tend to go on different days, but I will have a chat and pass on your regards when I see him next.
I havnt done a lot of work on Trainz models (either the Tangara, the 86 class, or the side project) in the last week or so. Im hoping to spend some time on it tomorrow (I have Mondays off, but I also have some errands to run). The Tangara has become a little bogged down in the texturing stage, but Im hoping to remedy that the next time I can get a few uninterupted hours on it. Ive tried a few experiments, which havnt worked as well as I would have liked, so Im planning to hit it with a bit of force this time, and just do what works in order to get it to a point where I can show a different looking screen shot than what Ive previously posted.
Sunday, August 06, 2006
Central Station's 100th Birthday Party
 I have to say I was very dissapointed when I walked down to Central Station on Saturday to take part in the 100th aniversary celebrations.
This week has been an important one for rail heritage in New South Wales, with the state government using the 100th aniversary of the opening of Central Station to announce its future rail heritage plans, but the event itself clearly demonstarted to me that Railcorp is more concerned with the future than celebrating a century of transportation at one of Sydney's oldest stations.
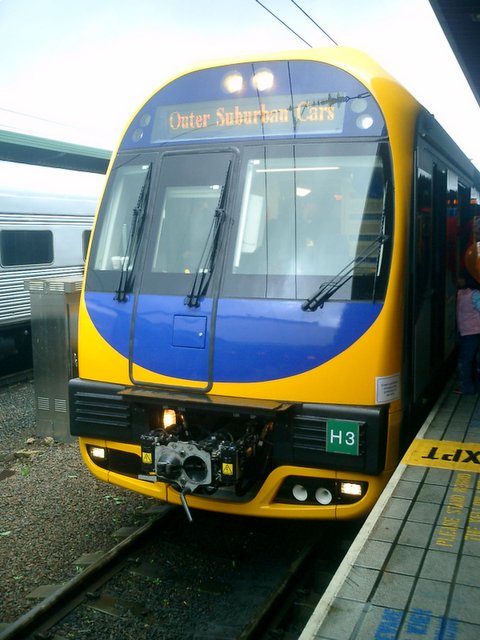
The impression I was left with, after spending several hours wandering around the station, looking at the trains on display, was the the whole thing was a combined childrens birthday party and promotional exhibition for EDI Rail, the manufacturer of the Millenium train - one of the newest trains in the fleet.
The even newer Outer Suburban Cars (also known as OSCAR) (pictured) was also on display, but if its manufacturer, the United Group, was present, I really didnt notice them, except perhaps for one small banner which I can recall.
EDI on the other hand had at least two stalls handing out promotional material on platform one, and another in the main hall, and people on the trains answering questions.
There were a couple of guys in futuristic yet cartoonish jetpack styled outfits, acting like robots, there was also face paining, temporary tattoos, and at least 2 brightly coloured girls, making balloon anmals as they wandered up and down the platform entertaining the kiddies.
There was one old rail motor (CPH 18), a 45 class diesel (4520), idling in the escape road between platforms 3 and 4, and two steam trains running shuttle trips to Hurstville and back (3801, 3830). I got the distinct impression that the "Heritage" part of the display was the steam trains arriving and departing from platform 3 every few minutes.
Where was the electric heritage fleet? Where were the red rattlers which graced Central Station with their presence daily for over 75 years? I have no idea, and am at a loss to explain their absence, considering that Railcorp itself owns two complete and working red rattler sets, which I know were ready for the day, because I have spent one weekend a month for the last 7 months cleaning them!! I cant understand why Railcorp did not have them on show beside the Oscar and Millenium trains - there was definately enough room left on platform one for at least one, or perhaps both heritage sets.
As recently as two weeks ago I was told that at least one of them would be at Central on the day - perhaps both. and I was asked to come along to help guide people through them and answer their questions. The next time I go to Redfern Workshops, I will have a few questions of my own to ask - namely, What happened?.
A recent tour by one of the red rattler sets was postponed because Railcorp could not find drivers qualified to opertate their own heritage fleet, and I have previously been told that they apparently think that the public has little interest in these aging trains - a statement proven wrong by the popularity of the W set when it ran shuttles to Olympic Park last year.
I dont have all the answers yet, but I often get the impression that when it comes to heritage rail, Railcorp and the state government are not really trying, and as was shown today, to them, celebrating 100 years of Central Station history means promoting the two newest trains in its fleet (one of which is so new that it has not even started revenue service yet), and putting on a couple of steam trains to keep the heritage crowd quiet.
I'll post more when I find out why the red rattlers never made it to the party.

Progress Update
 Here I am, hard at work.... well, not really - I pinched the picture from the Internet since I dont have any screenshots that I can post at the moment.
Im still working on things, but dont have a lot of progreess that I can show right now. Rest assured that Im working on it, and you will see the results sometime soon.
The main thing I have been doing in the last week or so is slowly piecing together all the small bits of script that I have collected, along with some of my own ideas, in order to produce a script that can drive all of the features that I have in mind.
For the moment, Im working on the basics - lights, drivers, doors etc. I will be able to use these functions in all of the traincars that Im currently working on - the 86 class, the Tangara, and even in the side project, which is still coming along slowly, with the animations done, and just a little tweaking of the mesh still to do, before I can finally finish it off with a little scripting.
Scripting doesnt lend itself too well to screenshots, so although I dont have much to show for the last couple of weeks work, I do have some code that is now beginning to take the shape which I had in mind. Bear with me, I'll have things to show you all again soon.
Thursday, July 27, 2006
Latest Ramblings
 Ive been working with Gmax on and off over the last couple of weeks. I havnt managed to get back in to my obsessive, every day, gmax habit that I was in before, but Im in there at least a couple of times a week recently.
Im about two thirds of the way through my side project, so thats coming along, and Ive done some more on the Tangara in the last few days. I dont have any screen shots, because not much has changed, visually.
Im still working on getting the texture mappings right for the outer body, and have been doing a bit of hand optimising while Im at it. In the last few days I shaved around 50 or 60 polys off of the body. The body itself is around 2300 polys in total, so I think thats a significant saving. It also helps with the texture mapping.
I knew textures would be the hard part. I havnt even started trying to draw in any detail - Im still trying to get the basic shapes mapped out onto the bitmaps. Ive decided to break it down a little. Originally I was trying to map the body to a single 1024 by 1024 bitmap, but Ive now broken that down into two 512 by 512 bitmaps, and will see if that helps. One thing that does help is being able to see how others have done it, so along with all the Auran samples on the Content Creation Art CDs, the side project has also helped in that department.
Im still thinking about the scripting, but that is a while off - I wont be starting on that until I have the control trailer textured so that I can export it to Trainz and test out the scripts. The other reason that it has to be textured now is that once its done, I can begin copying it to create the other cars (9 in total). Since the first one will already be textured, the copies will have most of their textures already in place, and will only need a bit of tweaking, and customisation here and there. It saves me having to go through this frustrating exercise multiple times.
Ive been collecting bits of script for months, and searching the forums for tips and tricks, such as how to tell if you are in driver or surveyor, or how to tell if you're in DCC mode or Cab mode. All of these snippets have been tucked away, and Ive found a few great example scripts which I can use a few pieces from. Many thanks to everyone who releases unencrypted scripts with their freeware - it helps newbies like me learn the tricks and see how they're implemented.
I know there is quite a long way to go. After 9 months, I really wish it was all finished, but theres many more months left to complete all of my currently active projects, and there are many more projects that I want to get started on. Its looking like I'll never get around to some of them - but that is what prioritising is for.
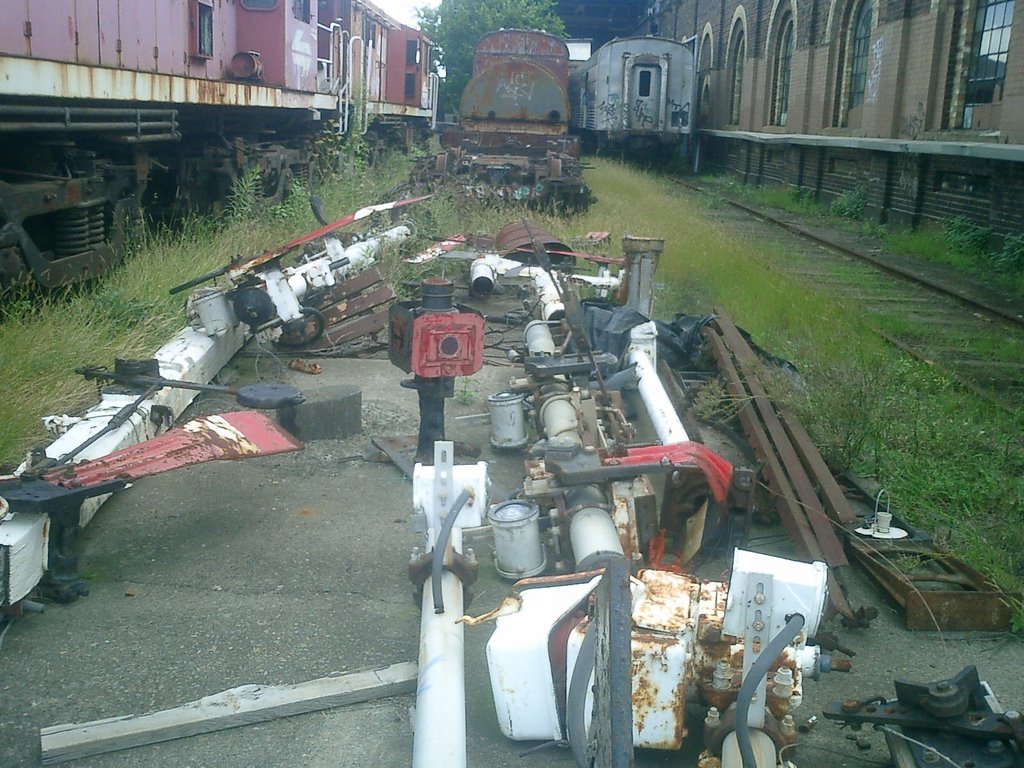
Photo: Rotten Row at Redfern
Wednesday, July 12, 2006
Im Back!
As I mentioned last time, Ive had a break for a few weeks. This happens all the time, and for me its quite normal. I work on a project for months straight and then just have to walk away from it for a little while. In the case of the Tangara, its been just over 7 months so far, and Ive worked on it fairly constantly over that time.
The good news is that Im back! Ive been forcing myself to get back into Gmax for the last few days, and finally I managed it last night. Tonight was the second night, so I think things should get back to normal from now on.
For the moment, Im working on something else, which is still Trainz related so you will benefit from it, however I dont want to post screen shots since I am working with someone elses models, and will leave it to them to make any announcements when its released. I expect this will take a few weeks, and I will try to do a little on the Tangara and 86 Class as I go, but for the moment I want to focus on this to ensure it gets started. So far, Ive just about completed the work that Im doing to the first model, and should be able to replicate most of that to the next one, so Im at least part way there.
I'll post more soon, and some screenshots of the Tangara and 86 Class, but wanted to at least let everyone know that things are progressing again.
Sunday, July 02, 2006
Busy Busy Busy
 Wow. Its been a busy couple of weeks, and with everything else thats been going on, I guess Ive needed a bit of a break from Gmax, but a few things have been happening on the sidelines that you might find interesting.
Its not that I actually took a break, its more that so much else has been happening that I just didnt have the brain capacity left to deal with complex shapes in three dimensional space. Things seem to have calmed down a little now and hopefully I will get back into modelling soon.
First a bit of self-promotion: You may have noticed the "Atom" button towards the lower right of the page. If you have an Atom reader or use a web site which lets you add Atom feeds to your personal page, you can get headlines from this blog, and can easily see when Ive added a new article. I meant to mention that weeks ago when I created the button.
So, basically Ive just been doing other things for a while. Real life stuff, and also a bit of goofing around because we all need to unwind occasionally. For example... I discovered YouTube which is a brilliant idea, and a great time waster. You can sit and watch videos for hours. Make sure you check out the videos by Brookers. Her fresh style caught my attention well before I discovered that it had also caught the eye of the NBC network, who promptly hired her. There are a lot of other good videos too - and a ton of crap. For my personal favourite its best to go directly to their home page for the full story, and if you like the Honda Accord "Things Work" commercial, you'll find the full length version on YouTube too. (you know... the domino effect one - you'll recognise it about a minute in).
You remembered to search for a few train related keywords, right? Try Cityrail, Tangara, Zigzag, "NSW train" etc. In case I missed it, theres a cab ride across the harbour bridge too. YouTube looking more interesting now?? If you really want to be impressed try Shinkansen, Nozomi, or FastTech. Doh! Ive created another YouTube addict.
What else. Lets see... I bought MSTS on special for $12.95 and have had a bit of look at that. I needed to see it for myself to see how it is different to Trainz. Both have strengths and weaknesses, but I think I still prefer Trainz.
Work has been busy lately with a few problems that Im still fixing now (even over the weekend). At least I can log in from here and dont have to travel to the office.
I spent Saturday at HET preparing both of the Red Rattler sets for a tour at the end of the month. RailCorp still hasnt decided if they will allow the manual door F1 set to run. If they dont, the other set (W3) has automatic doors and will be our backup plan, so they both have to be ready just in case.
A lot more has been going on, but these are a few things that come to mind right now.
Once I get back into Gmax I have a few things to do. Naturally theres the Tangara and the 86 Class to finish, and a few smaller things to think about, but theres something else as well. I always save the best until last, to make it worthwhile to those who read through all this waffle, so heres what I can tell you...
Ive come to an arrangement with another Trainz content creator to do some work on a couple of his models. I dont want to say too much at this stage because when its complete it will be a welcome surprise to all NSW Trainz fanatics, and its all about the models rather than my small part, so I want the creator to get all the fuss when he finally releases them. Im only mentioning it here to let all of you know that there is something else that I will be spending my time on, so progress on the 86 and the Tangara will be a little slower than usual over the next few weeks.
Im still trying to figure out the texturing for the Tangara, but I have read a lot and looked at some textures on other models to get an idea of how everyone else does it, so its progressing, but just a little slower than I would like. I always said that the texturing would be the hard part. Between complex scripting and texturing, I'll take the scripting any time! I'll keep you up to date on the Tangara, but naturally I cant post updates on the other "secret" project. Im sure you'll appreciate it when its done. Its minor work, so hopefully it should be done within a few weeks.
Before the break, I managed to get a fair bit done on the 86 Class interior which I havnt posted here yet. Theres still more to do but most of the levers and main attachment points are in place and just need a little tweaking. The S set interior will also get some attention soon, as its been a while since I worked on that, and Im still waiting for someone to start a Japanese Trainz group :)
The photo above was taken in the far corner of the yard at Redfern Carriage Workshops a couple of weeks ago.
Hmm, extra long post - too much stuff in my head. Back to normal next week I hope.
Wednesday, June 21, 2006
Buffers, Tangara, and Japan
 I released the buffers recently, despite not being 100% happy with them. I had thought about releasing a scripted buffer that would allow the placement of the light (left, right, center, none) via surveyor, but it seemed too hard for what it was. I also wasnt happy with the textures, but they had been sitting around for a while, so I thought they were better out there, than on my hard drive.
I hope to update them soon, fixing the textures, and adding a parameter which should make them actually stop slow moving trains. I have to admit, Ive read the CCG many times, but this hadnt stood out. It makes sense, since without such a parameter, Trainz has no way of telling a buffer from any other trackside object. For the moment, this feature is broken in TRS2K6, so it wont matter until after SP1 is released (unless you have 2K4).
I spent last weekend mainly researching other projects which have caught my attention. I wasnt making much progress with the Tangara texturing, so it was a welcome break. Above is a screenshot I grabbed a couple of weeks ago, and meant to post here at some point. Today is as good a day as any.
There has been some discussion on the Trainz forums recently about Japanese trains and routes, with a few new items being worked on. This is something close to my heart, since my wife is Japanese, and we have close ties to Japan. Much like my reasons for building NSW trains, I'd love to build some Japanese ones too, since there is virtually nothing available to date.
Yes, I know about the two Shinkansen (Bullet Trains) on TrainzLuvr, but those are a few cars short of a train set, and have other problems as well. There are also two 500 Series Shinkansen on the DLS by Tesla and Votkov. The one by Votkov looks promising but I havnt tried it yet. If I can repair the faults reported by 2K6, it may be the only one which is complete.
Japan has a rich variety of trains, from steam to single car diesel railcars, to freight, to the latest and most sophisticated EMU sets (There are around 14 different series of Shinkansen alone, since the original Bullet Train started in 1964). Add to that the awesome and wildly varying scenery, and its a no-brainer. It has to be one of the best countries for railfans to model - hands down. Japan is built on rail. There are rail lines everywhere! Do yourself a favour and take a look.
So why is there nothing available for Trainz?? Well, I thought about that while I was looking for somewhere to run the Shinkansen I was testing. There arent a lot of routes to run a 320 meter train which travels at 300km/hour. There certainly arent any Japanese routes or Shikansen lines on the DLS. I think the biggest obstacle to route builders is the lack of Japanese buildings, scenery, and textures. Regardless of whether Auran thought about marketing Trainz to Japan or not, it would be pretty difficult to do so without Japanese content and without a lot of Japanese creators on board, the content hasnt appeared. Its a catch 22.
Well, the flow of content is starting to trickle in the form of rollingstock, but that still leaves us without any routes to run it on. There have been a few attempts at a Japanese route, but these havnt looked the part, since every building, sign, signal, and station has had to be substituted with an existing US, European, or Australian model. Unfortunately, if it doesnt look the part, its not much different to whats already available, but Its a good effort, and we have to start somewhere.
We have to give our route builders a leg-up. They need scenery to work with, so while I have my hands full modelling local content, Ive started to collect photos and other useful research material from the web, including some really good finds. I have SRTM data from Tokyo to Osaka, (and more on the way) and have thought about building the Tokaido Shinkansen line, but its a huge project (500km from end to end, including that classic scene of Mt Fuji) and unfortunately its not something I have time for right now. I estimate it would be over 1000 base boards, but it would be SO worth it. (Yes, 1000+ its possible - check the forums).
For now, the research and data is here, but this will have to wait. I may knock out a traditional house, or a Japanese advertising sign, a prefecture castle, or a temple occasionally. I'd love to see a group form who could focus on Japanese content, but I have a few local things to do first before I can start one - any takers?
Sunday, June 18, 2006
Wooden Buffers Uploaded
 Ive uploaded two versions of the buffer stops to the DLS, one lit, and one without a light. The unlit one had to be uploaded again so it may take a little longer to get to the DLS. Look for them in a couple of days. Compatible with TRS2004 and above.
Train Stops Updated
 Ive just uploaded an updated version of the Train Stops to the DLS. This update fixes a problem with the stops being in an unknown state until the signal has changed at least once. The revised version now properly syncs itself to the signal, and will appear in the right position (up or down) when the route is first loaded. Allow a couple of days for it to pass through the approval process. Compatible with TRS2004 and above.
Monday, June 12, 2006
Tangara Progress
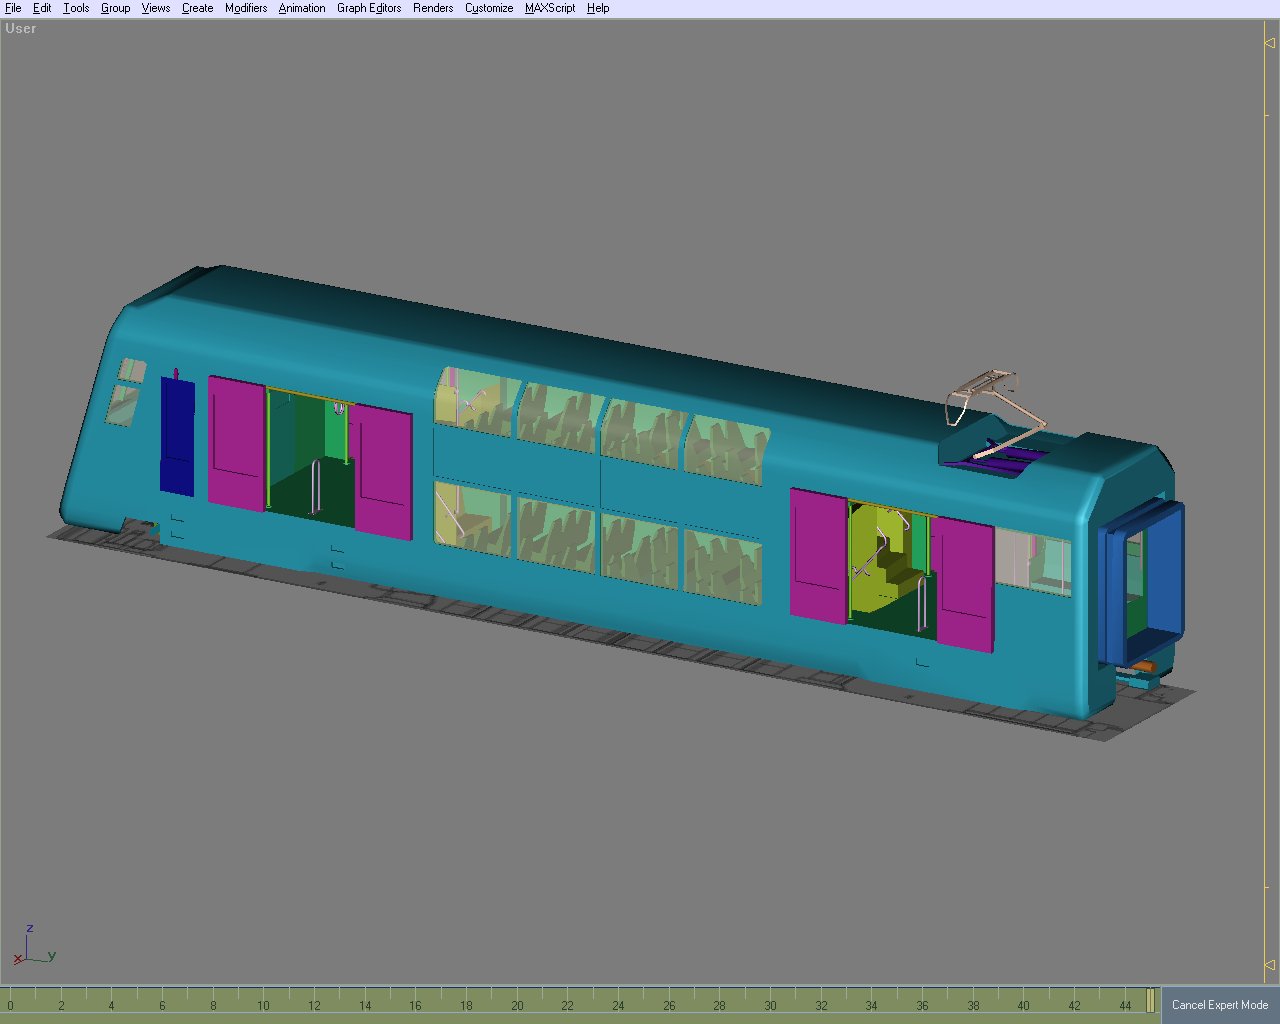
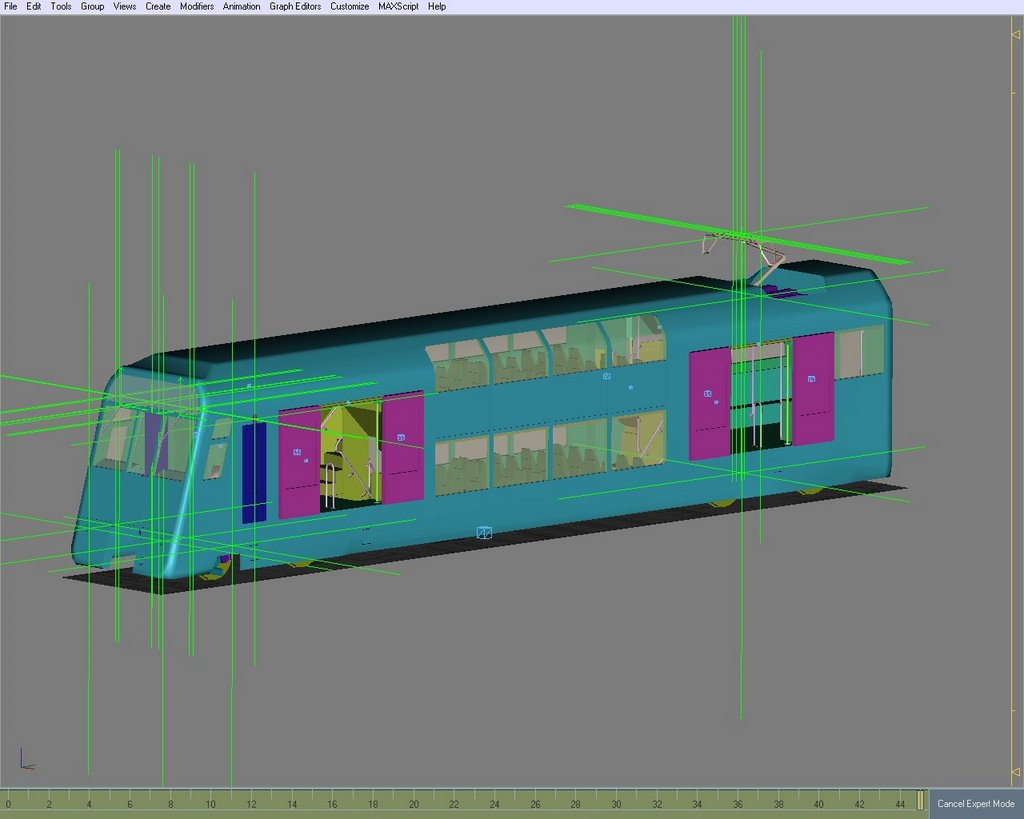
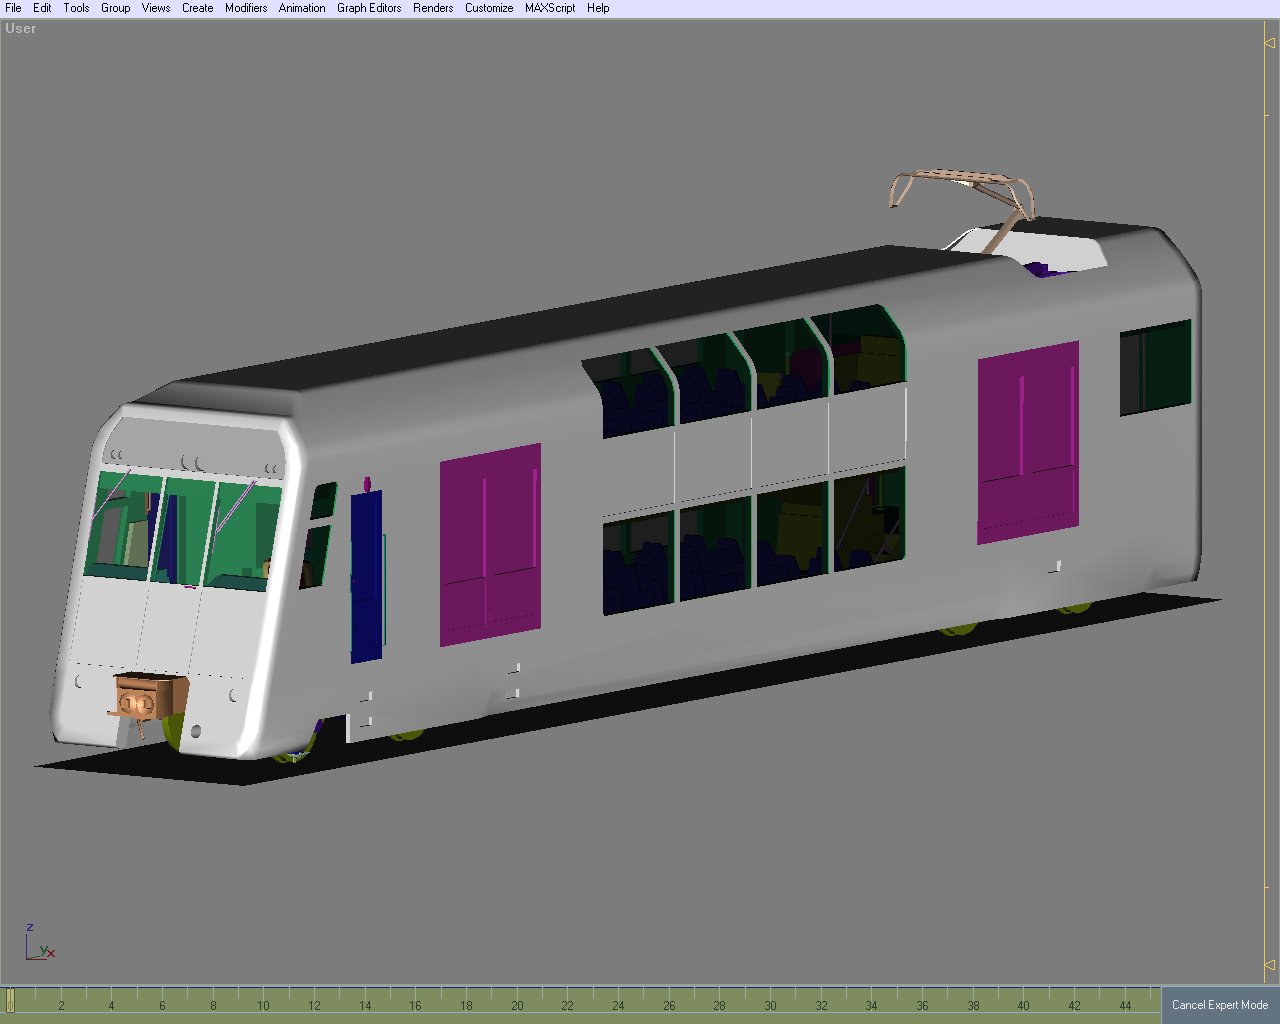 Ive started texturing the Tangara. As you can see I havnt done much. so far I have been experimenting and trying to figure out how to break it up into smaller chunks for mapping. Unless youve read my earlier posts, you might not realise that this is my first major Gmax creation, so I am still figureing out how to best apply complex textures.
All the tweaking of the model is done. Ive finished the drivers cab (except for the detailed "cab mode" view), and Ive finished the Train Stop trip arm, thanks to the photos I took recently. The only part of the model that still needs to be finished is the intercar gangway.
I started on the gangway again, and had it all figured out. I was making progress, and then Gmax crashed, so its back to its original form and I will do it again later when I have time. I did try to save my work, but ended up with an unreadable file, so if you're not using versioned saves (and from all the "I lost my gmax file" forum posts, I know that many arent) you should be! It took me all of 30 seconds to recover the previous save, and I only lost a few minutes work.
Back to the texturing... I textured the windows first, and thought I'd be clever and tint them in Gmax without using a texture file (thus saving resources), but apparently the Trainz exporter requires all surfaces to have a UVW map, which implies a texture file, so I will see what I can figure out. The dark windows look darker in this picture due to the angle and specular lighting. They're not so dark on the model, and the specular lighting makes them shine, even in Gmax's simple viewport rendering.
So far, the body is covered in a simple white texture, and I am now trying to select areas to create the UVW maps. Figuring out the mappings is difficult, but Im getting there. Ive reduced the number of visible edges so that I can select whole areas as a single polygon. This helps me set up the UVW mapping, and as I get the areas selected, I assign a material ID to them. Once I have the body mapped out, I'll edit the texture file to add some detail.
Im going to use Lithunwrap to create a bitmap showing the UVW mapping, and will convert that to a TGA and then finally use The Gimp to draw in some detail. Ive seen tutorials that suggest using a screen shot as the bitmap, but to me that approach lacks finesse. While my approach involves a lot of messy exporting and file conversion, I will end up with texture files that map directly to the pixel!! You cant get much better than that.
On another subject, Ive been struggling with what to do about poly counts. I like to post them here as it shows progress as the model gets more complex, but I dont want to scare people off, since there are usually more polys in the work-in-progress than will be in the finished model. Estimating the final count was not working - from week to week, I couldnt remember what I had included in previous counts, and what I hadnt.
I decided to not post poly counts, but felt that the posts had lost that progress indicator, and then I read some comments from PaulHobbs who said something along the lines of: "Beware creators who wont tell you the poly count of their models", and I agree, so I have decided to post the in-progress count, as displayed by the Gmax poly counter, along with a disclaimer which hopefully explains the situation. Ive set this up as a template so it should become fairly standard.
I havnt added thousands of polys since the last count (ok... maybe one thousand) - Ive just stopped subtracting all the bits that will be separated or excluded from the main in-game model when its exported.
File Version: 369
Poly Count: 18139
Note: The poly count shown here is for the gmax model in progress. The count will generally be higher than that of the finished in-game model since it includes various tools and other pieces which may not be part of the final model. LOD moddelling will be used to further reduce in-game polygons.
Wednesday, June 07, 2006
Quick 86 Class update
 While the Tangara is my favourite EMU, the 86 Class is my favourite locomotive, and I just cant keep away from it - no matter how I try to finish the Tangara... besides I need a break every now and again from one model, so I work on the other for a while.
Ive gone back to the outside, and left the fridge and interior back wall for later. Ive detailed around the doors and added a few hand rails, which still need to be tweaked a little - especially the one at the front, which needs a few polys removed - I figure I can get rid of about 80 polys without making it look any different, but its a painstaking process of eliminating verticies one by one. Does anyone know an easy way of removing redundant verts without deforming the mesh - kind of like a reverse "Mesh Smooth" ? I certainly havnt found it in Gmax yet.
Ive finally decided that the 86 will be payware, which means I have to finish off the web site that I have been playing around with so far - at least theres no rush, it will be a while before the 86 is finished. I havnt decided on the price yet, but it will be no more than five bucks. Just so as you know.
File Version: 72
Monday, June 05, 2006
Tangara Progress
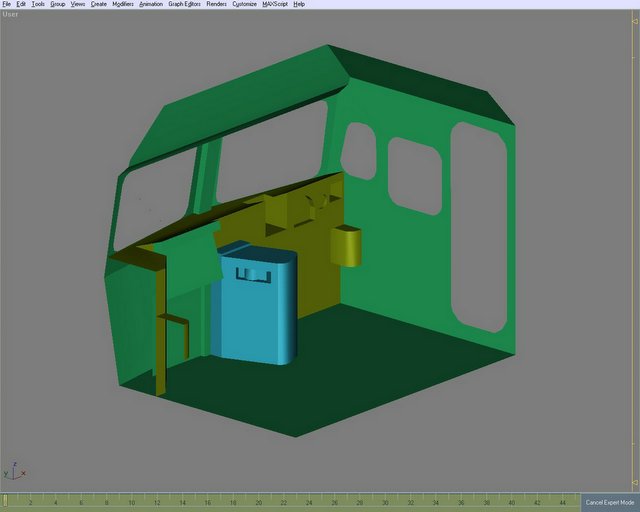
 Ive been getting the base model ready for texturing and tweaking a few things here and there. As I mentioned last week, Ive been having a closer look at the drivers cabin and have noticed quite a lot of detail that I missed - mainly in the structure of the walls and ceiling, so I have been getting that right.
Ive lowered the ceiling and added the fluro lights that run across the back wall. Ive fixed the area above the doors, and have added the recess for the fire extinguisher. I just have to finish the ceiling at the front, which has some kind of overhead console, or equipment box which will give me the right shape on which to lay the textures.
Ive removed a few textures that came along with some of the imported pieces (such as Auran's driver's chair and extinguisher from the DD40) and deleted all the materials from the navigator so that I can start fresh. During this process of tweaking, theres not really a lot to see as things get moved around only slightly. It doesnt really look that different, but it will make the finished model a much cleaner base to start from.
While I was at HET on Saturday I managed to get some detailed close up photos of a Train Stop trip arm, and this has helped me figure out how best to build it, so that will be done soon. I also got some photos of an actual drivers chair, complete with HMC printed on the fabric (Hornsby Maintenance Center) so I will be using that as the texture for a more realistic look. I spent the rest of the day cleaning and vacuming F1 (an old manual door red rattler set) to get it ready for a trip in a few weeks time.
Ive also figured out how the gangway should work, so thats another thing to finish. The texturing should start soon, but I am waiting until Im happier with the model. Theres no point texturing if Im going to start deleting things and replacing them with new pieces - I'd have to texture them over again.
For those who arent sure of the plan, once this model of the control trailer is finished and textured, I will be using it as a base to create 9 more models which will make up the completed project. Theres 2 cars for the T set, 3 cars for the G set, and 2 for the 4D, plus another 2 cars to build the stripped 4D that I mentioned in an earlier post. As you can see, its important to get this one right before I start copying it to build the others - if for example the gangway isnt right, I will have to edit 14 of them to correct the problem, rather than just one. Thats why Im taking my time, and tweaking this model until Im happy with it. It should be fairly quick to build the other models once this one is ready - just a matter of highlighting a few difference between the various types of carriage.
Ive given up on inlcuding the poly count in these posts. Due to the way Im building the model (with eveything in one file for now) the count doesnt really add up the way Auran break it down, and I really cant be bothered subtractracting all the pieces that wont be in the final model - in fact ive forgotten which counts include what, which makes comparing them difficult.
File Version: 362
Wednesday, May 31, 2006
86 Class Progress
 Ive been busy this week with real work, and so have not had as much time to spend with Gmax as I would like. This will probably continue for the next few weeks. If you're interested, Im building a mainframe Linux-390 system on my PC (using an emulator) to be uploaded and run on a real S/390 mainframe hopefully in the near future.
I did manage to do a bit of work in Gmax, and it was mainly on the 86 Class, with a little tweaking of the Tangara. Ive been peaking into Tangara cabs lately and have noticed a couple of things that I didnt see before, so these have been added. I'll get to skinning it soon, and will post a Tangara update when I have something new to report.
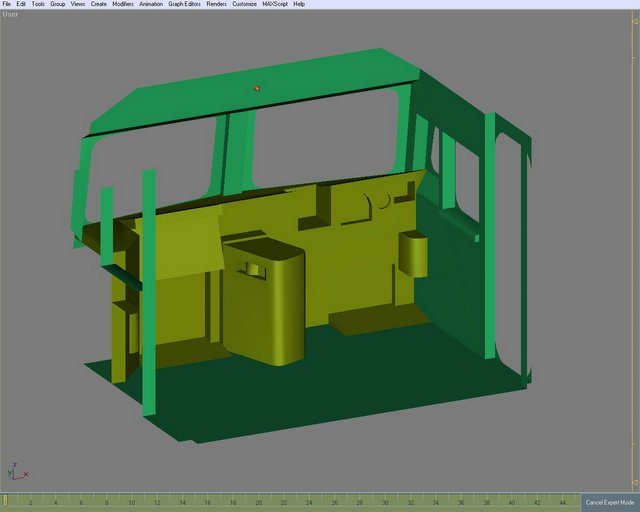
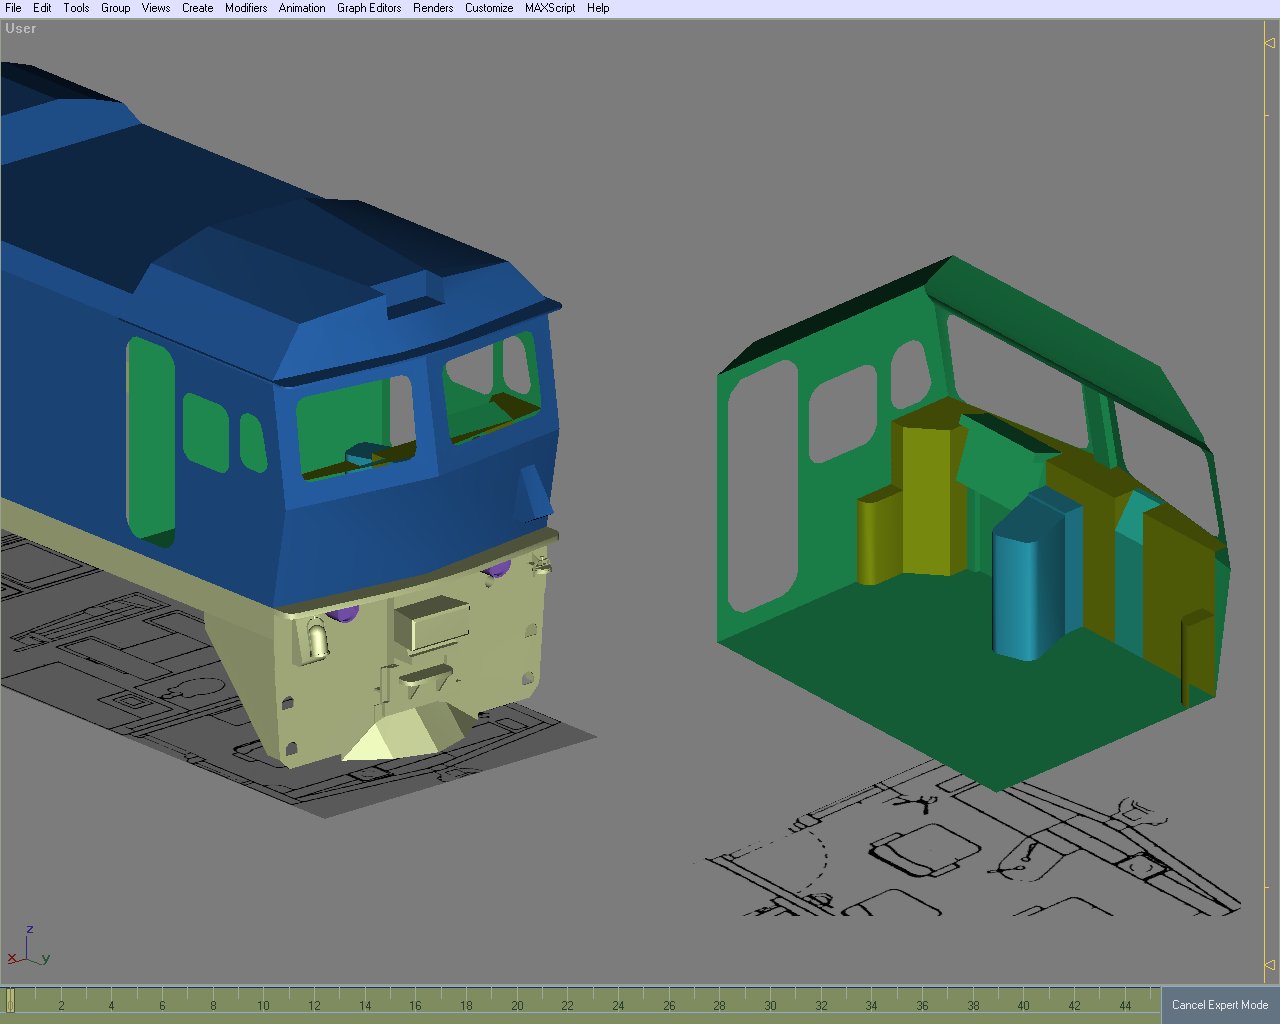
On the 86 Class, I have continued to work on the cab, and have detailed the left and right walls. There has also been a bit of tweaking of the dash / console area and the master controller, and the floor has been raised. If you're familiar with an 86 Class cab, you should recognise the picture above, thanks to the excellent photos that I have been working from.
The back wall will be next and shouldnt take long as there is not much detail there - just the AC controls, a fridge, an extinguisher, and a door handle. The rest can be done on the textures. I threw the plans out the window for a while, and just worked from photos, but as I began to figure out how everything fits, I realised that the plan was pretty close, and it was my floor that was wrong. Once I raised the floor, everything started to align properly again. (This is a different alignment problem from the one I mentioned earlier).
I recieved the back issues of Under The Wires that I had ordered, and these have some helpfull articles. Unfortunately one of the operating manuals that I ordered was out of stock, and I already have a PDF version of the one which did arrive. I had been looking forward to the missing one, as I was hoping that it might give me a bit more detail on the master controller. Hopefully I can get what I need from other sources. (I'll try the Railpage forums when I need to).
I deleted some duplicated parts, which dropped the poly count a bit. The count below is half of the loco, so double it for the whole thing.
File Version: 69
Poly count: 4300
Tuesday, May 23, 2006
Tangara Progress
 Ive just finished the base model. Theres still a lot of work to be done, so dont get too excited just yet. I need to tweak it a bit as Im not quite happy with the gangway, and a few other things.
The gangway took a lot of time. Most of it spent sitting and staring, trying to figure out how it would work when it was complete. Its a complex piece, since it will be animated, and if I can get it right, it will also swivel as the train goes around a bend. So that it doesnt show through walls etc, it has to be just right for it to work properly, and it took a while to figure out. No doubt it will be modified several times through trial and error before its finally finished.
Similar issues trying to figure out how best to implement the train stop trip arm - I gave up on it for now, since its not part of the main structure. It will be attached to the bogie, so I will deal with it when I finish those off.
So, the next step is a bit of tweaking, and then I can start to seperate the pieces, animate and texture it, and then start to create the other models, while I test it out in Trainz.
The scripting is still a long way off, but I noticed Alex's comment on the previous post. I have many features on my list, and sparking is definately one of them (See the end of my April 8th post). As I said to someone earlier today, I plan to specialise in electric trains, so its pretty much an essential feature.
There is also still a lot of other work to be done. I still need to finish off a driver character. Ive started on one but its being difficult. The Cab Mode interior still needs to be done, with all the levers and switches put in their proper place. That will take a while as I have yet to build the digital gauges I mentioned earlier, and I also have to figure out the best way to do push buttons. I have a couple of ideas, so hopefully that wont be too hard.
Poly Count: 12900 (same method as last time)
File Version: 355
Tuesday, May 16, 2006
Tangara Progress
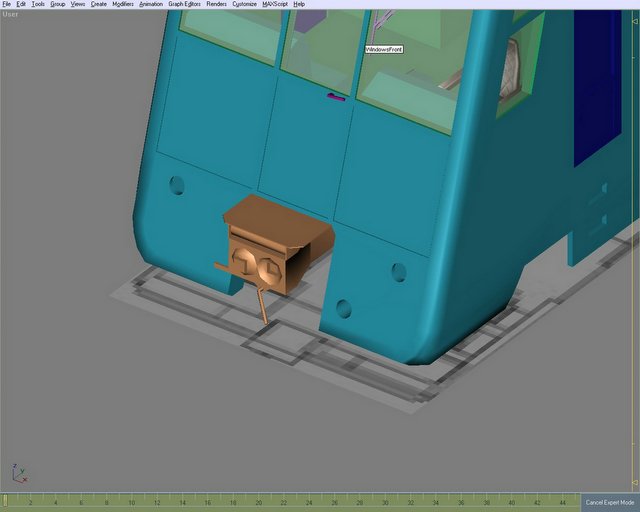 I spent whatever free time I had on Sunday evening and Monday working on the Tangara again. I started on the Train Stop trip arm, but decided to finish the front coupler instead. Here is the result. The coupler is finished, which now just leaves the remainder of the trip arm, and the intercar gangway to go. The rear coupler is fairly simple and will be incorporated into the gangway.
I did a quick poly count (below). Its starting to become difficult to give a proper estimate, since in Trainz the poly count generally only refers to the body, excluding things like bogies and pantographs, which have their own counts. I have quite a few objects in the scene which will be removed to their own files later, so I have to subtract them from the total, and on this occasion I was lazy and only subtracted the bogies. The count shown here is just to give an idea of the complexity of the model anyway.
Im aiming for around 12,000 for the exterior view (which includes a cut down version of the interior). Auran recommend 9,000 for a diesel loco, but an EMU has a more complex interior, and the Tangara is a double decker, so I believe it would be a little higher. Considering that and improvements in processor speeds in the couple of years since the Content Creation Guide was last updated, I think 12,000 is not too bad - I'll be using LOD anyway, so it'll be fine.
Anyway, I know I didnt add 2,000 polys since the last update, so I know the figure below is too high.
Poly count: 12,700
File Version: 348
Sunday, May 14, 2006
86 Class Progress
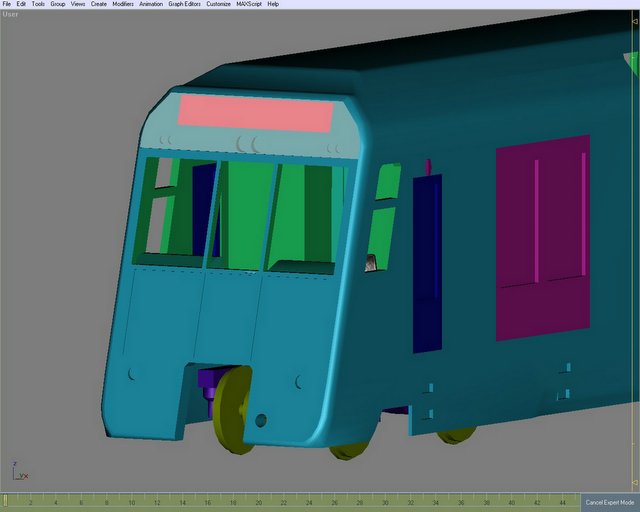
 Ok, I know most of you are eagerly awaiting the Tangara, but Ive done a bit more work on the 86 Class instead. One of the reasons Im posting this early (on Sunday afternoon) is that I plan to work on the Tangara this evening, and I can post another update later.
Ive been inspired recently by a collection of photographs that were sent to me. These show the 86 Class cab in great detail. First there was the one from Robbo, which helped enormously, and probably started the whole thing off. It was much better than anything that I already had, and got me started on detailing the drivers side of the cab.
Recently Chris from HET sent me several photos, and asked what else I needed, so I gave him a list and he sent me several more. Many thanks to both of you. Together with photos from magazine back issues, I now have the cab covered from every possible angle, and I have been working on it whenever I get the chance.
At the moment Im a little stuck because the interior does not match up with the exterior as well as I would like. Both are true to the plans, but sometimes when you are modelling you have to throw out the plan and just build it so that it looks right. Im currently in the process of matching the two sections together. The problem is basically that there is too much distance between them, making the window sills and door trim look too wide. I need to move the interior walls closer to the outside, which is complicated at the front by the angle of the front windows. Im making slow progress.
In the picture you can see the drivers side of the master controller, showing the recess where the reverser handle will be, and also the observers controls, where the park brake and pressure gauge will be. There is also a cutout for the hotplate which will be added later.
As I mentioned before, I have been considering whether the finished 86 Class will be payware or freeware, and I have realised that until it is complete, I cant easily weigh up what has gone into it. I have a lot planned, but it all depends on how well the script comes together, and I cant even start on that until I have the model built, textured, and imported into Trainz. I will make the final decision once I have a better idea of how it is all coming together, but you should know that I am leaning towards payware for this one, especially if my plans all work out. Even so, it will be well worth the low cost.
File version: 62
Poly count: 6125
Monday, May 08, 2006
86 Class Update
 Im still thinking about a few Tangara issues, and Im having problems with the buffers, so I have done a little more on the 86 Class.
To answer Ben's question in a previous comment, you will find that the features and versions of the Tangara have been discussed earlier in this blog. (check the archives). I dont really expect people to be familiar with every word I write here, but I also dont want to repeat myself too often. You will also find a clue in my project list to the right.
To address Allans concern at my not having updated the blog in two weeks, sometimes it happens. Im finding modelling a little tough at the moment, slogging through strange problems that really shouldnt happen. For example, I have two buffer models, the only difference between them is the presence of a light on one of them (shown in the last post). One buffer model displays its textures correctly in Trainz (the one with the light) but the other doesnt. Im also still thinking about some Tangara issues, which I would like to have resolved in my mind before I continue, and then there is real life. For example, this weekend was basically a write off - a HET Workday on Saturday (I generally go once per month), and a family BBQ on the Sunday left little time for modelling, but I did manage to squeeze in an hour or two here and there.
Over the last couple of weeks, I have been very slowly piecing together the interior of the 86 Class from a couple of photos. Thanks to Robbo for one of those. The interior is still a bit blocky, but I am refining the detail and merging seperate objects together as I go. I really need some shots of the observers side of the cab, though I can fake it from the plans I have. I'd also like a shot of the Master Controller (preferrably with the reverser handle present) looking from the drivers perspective (from the seat or through the drivers side window).
Im still gathering resources, and have just obtained 5 selected backissues of Motive Power, with around 10 or so back issues of Under The Wires still to come, as well as the actual 86 Class operating manuals, which I ordered today. Im also expecting some photos from another HET member who I met on Saturday, so hopefully I will have the cab covered soon.
I cut out the cab doors from the exterior, and then spent some time cleaning up the mess made by the boolean cutting tool. I just about have the exterior back the way it was, but still have to tweak the door and window cut outs a little.
Ive spent some time thinking about the cab script. If you know the 86 Class, you will know that the throttle is not as simple as the standard 8-notches of varying speed as found in many Trainz models. The 86 Class has 5 notches and a complex procedure that must be followed using just 3 of those notches to "notch-in" and "notch-out" resistances which control the amount of power delivered to the DC motors. I believe I can write a script to emulate that, for a realistic driving experience.
I realised recently that I have not yet decided if this will be freeware or payware. I will make that decision soon. Given that extra attention will be paid to the details, since it is my favourite loco, plus the additional scripting to make it drive like an 86 Class, and the cost of research material so far, it is likely that it will be payware, but I will keep everyone posted here.
File Version: 58
Poly count: 5824
Monday, April 24, 2006
Buffer Progress
 I guess Ive needed a break from the Tangara. This is normal for me. I spend months focused on a single project and then have to get away from it for a while. Im sure that I will get back to that soon.
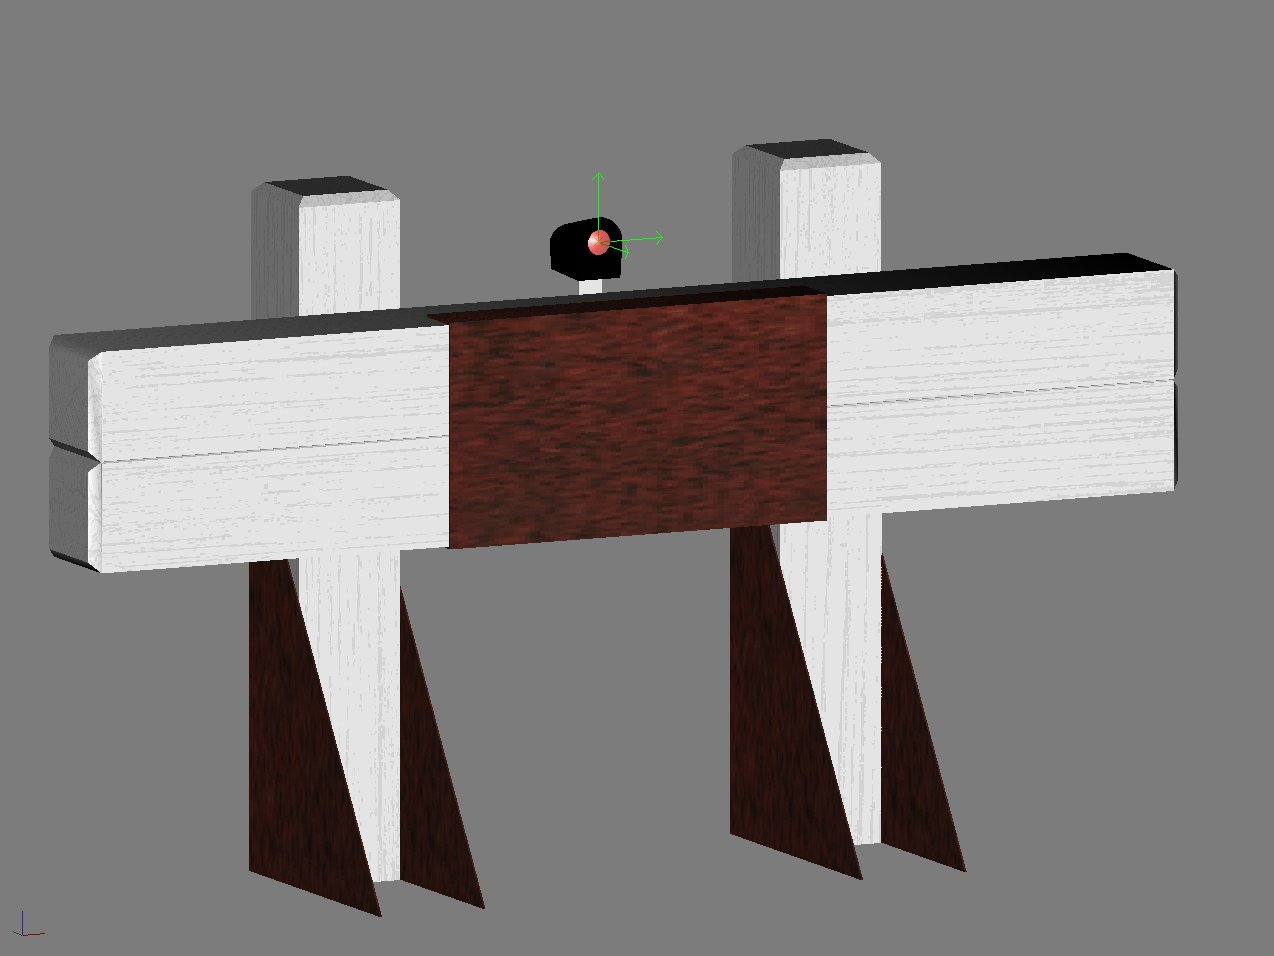
Ive done some more work on the buffer stops that I started months ago, and now have the model finished. Im still trying to get the textures right, but this is a good thing, as I really do need to learn more about texturing before I start trying to skin something as complex as the Tangara.
As always, Ive read tons of forum posts and tutorials, and am jumping right in, avoiding many newbie mistakes. Ive figured out the relationships between ambient, diffuse, and specular lighting. Ive tweaked Gmax so that it will actually output these values (the default Asset Creation Studio settings dont do specular etc) and Im using the Max plugins so that bump mapping will work.
The Content Creation Guide recommends that you should only use bump mapping on locomotives, but I am experimenting with it here, because these buffers have a coarse wood grain which normally shows as bumps under the thick white paint that they are covered in. You can see the grain in the picture, but that screen grab has no bump mapping and looks kind of flat. When I get something that I am happy with, I'll move on to the scripting.
Its set up as a signal (as buffers should be), and I have set up the light that way too. Ive seen other buffers which use seperate corona effects or a night mesh to light them, but to me, setting the lamp up as a signal light seems like the right way, and works fine. I'd like to script it so that the light can optionally be placed in the center (as shown) or moved to the left or right post, or completely removed, since I have seen many different configurations in my travels.
Im thinking of using mesh attachments to do this, with a properties dialog used to switch them on and off. I will start on the script once Im happier with the way Trainz is rendering the textures.
Train Stop Fixes
Someone pointed out some problems with the train stops - most notably they werent initialising properly and would be in the wrong position until at least one train had passed. This has now been fixed.
There is also another issue, which I think is related to TRS2004 since I cant reproduce it in 2K6, where if you fly back to a signal, crossing a base board boundry as you go, the train stop appears in its default position, despite nothing having changed since you last saw it in the correct position. At this stage, I dont think there will be a fix for that one, as it seems that there are no obvious messages or hooks when this happens that I could detect and bind a fix to.
I'll be uploading an updated version soon.
Saturday, April 15, 2006
Comments on Comments
There hasnt been much progress on the Tangara this week, but I have been working on a few smaller items, and one or two pieces that will end up in the Tangara later.
Thanks for all the comments on the last post. I wanted to respond to some of them here.
Features
Nathan asked if the cab would be animated. It sure will!. How much is animated wlll depend on how long it all takes, how well I can communicate between the cab script and the exterior one. (That should be easy). Essential things like the driver will obviously go in first, while less-essential items like blinds will be added later, as time and skilz permit. Pretty much everything suggested was already on my list for considereation. (plus a few more ideas too). I'll keep you posted here, as it all progresses.
Alex mentioned the Cityrail Driver by Davido. I have seen it, and his Freightcorp drivers, but I would like to make my own for several reasons. (Some of which will become apparent when you get to see the Tangara). No offence to Davido, his models are excellent, and indeed I have been very impressed with everything so far from Cardiff Workshops, but I have some ideas in mind and making my own driver mesh would allow me some extra flexibility. This is one of the several smaller things that Ive been working on this week.
Payware
Payware is an issue that can polarise people. Some people "get it" and dont mind parting with a few bucks, others expect that everything should be handed to them for free, and most are somewhere in between.
Over recent months, a few people, (ky most recently) have commented at various times that the Tangara should be (or could be) payware. I take that as a very big compliment. Thank you. These comments generally mean that people appreciate the work that has been put in to the model, and I gratefully accept that.
Ive said from day one that the Tangara (and all its variants) will be FREE, and will be uploaded, unencrypted to the DLS to be looked at and learned from, however I am not promising the same for any future models that I might build. Each will be decided on its merits when its started. At present, I currently have no payware items planned.
Here is my take on payware:
Over the last 4 months, since starting on the Tangara, Ive spent quite a bit of time at my computer. Im a geek, so my wife is quite used to that, but recently it has been a lot more time that it used to be, and it has caused some friction on occasion.
Without even considering the number of hours spent working on the Tangara, I do feel that it would be nice to recieve a little appreciation for the time spent away from my family, but at the same time I also understand that its my choice to do that.
Its not about money - Im never going to get rich making 3D models. Its simply about people appreciating the effort that went in to it. Im hoping that Auran might select the Tangara to be included in future versions of Trainz, if its considered good enough, and that is one form of appreciation.
Money is obviously another form, and is merely a token. If I ever do release payware, it wont be more than a few bucks per download - definately under $5 (probably with a couple of dollars to spare) because accumulaing vast amounts of money is not the point. Its simply about saying Thank You.
Having said that, I am working on a Redfern Workshopz website to be released at some time in the future, and one of the required features will be an online store, to allow me to make payware models available, if I choose to do so. This is just one of many features that I require for the new site, and its no more, or no less important than the other required features, such as project management or forums.
Now, if only drupal would play nice.
Saturday, April 08, 2006
Tangara Progress
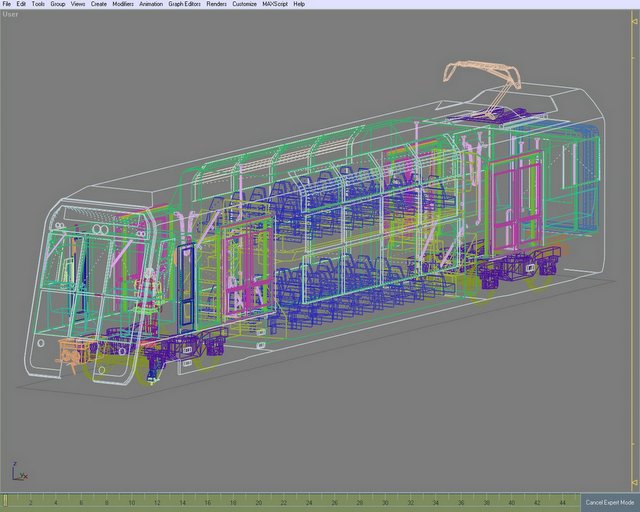
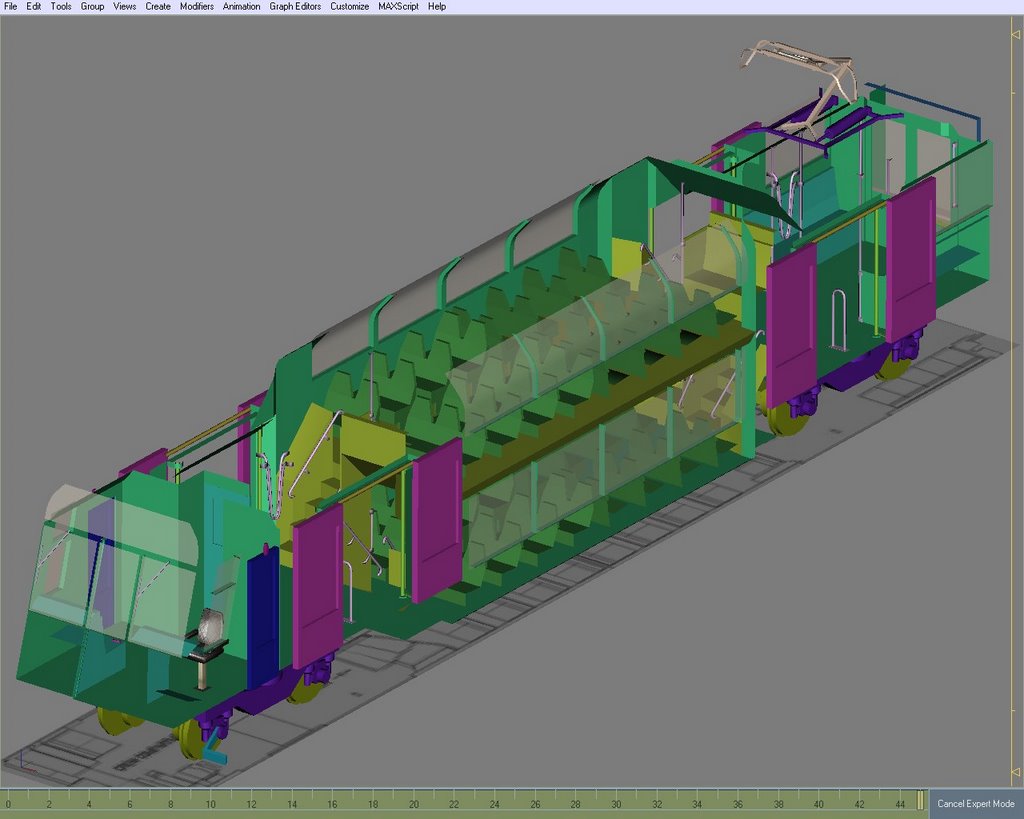 Ack! Im Naked!!
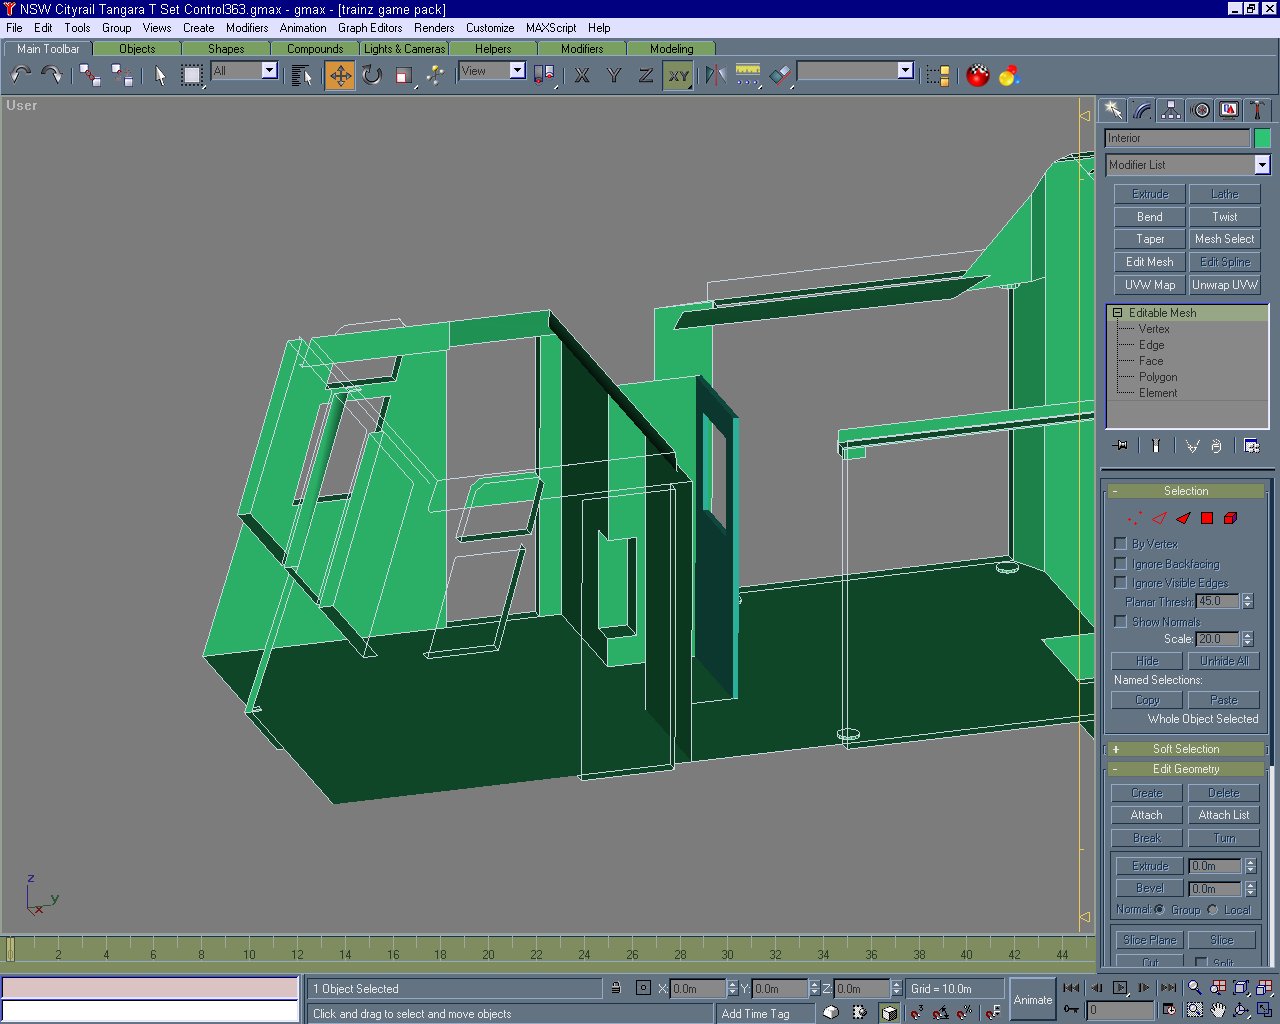
You've seen enough shots of the outside of the Tangara model, and I happened to be working on the model as shown (only the exterior body is hidden) so I thought I would share this unusual view.
Ive spent this week tweaking things. I started on the gangway, but realised I have no photographic evidence of it working the way I had imagined, so Im totally rethinking the animation I had planned for it. I had thought the internal "wings" (for want of a better name) folded back over the doors when disconnected, but it seems, from the photos I have managed to find that they remain in place, and there is only a very little amount of contraction of the corridor that occurs (much less spectacular in animation). Im leaving that until I think about it some more. Of course I could always use artistic license to make it animate better :)
I added the windows. Adjusted the position of some handrails and door inserts, and added the pantograph, which reminds me that I detailed the roof a little more around the cutout section where the pantograph goes (Its now curved like on the prototype). You'll see what I mean in future shots of the body.
Im thinking of redoing (yet again) the passenger door animation, to make it full cycle (closed - open - closed) which is what is needed for the sounds to work. Its currently half cycle (closed - open) as is used in the standard Auran left-passenger-door style of config (they play it backwards for the close sequence, which is not what I need).
I realised that I had not detailed the crew emergency door on the inside - it looked like it was part of the interior wall, so I quickly fixed that. I hope to animate it one day (but not today), so it will need more work eventually. Its fine for the initial release the way it is now. Of course having made a noticible door in the base model, I will have to reverse that when I make the 4D, which doesnt have that door.
I know I type too much, so speaking of the 4D, and since you're good enough to read this far, Im going to be building 2 versions of it. A running version, (which can also be parked as stored if you like) and a derelict version, stripped as it was, which can be loco-hauled (but undrivable). I think that makes it 4 train variations now, and 9 cars that will need to be built to cover those.
 Oh, yes, and I also added the wipers, and started on the Train Stop trip arm. (the hangy bit front left). Its starting to sound complex now, but its almost there. Somehow with all this work, Ive still managed to lose 300 polys on the last count - unless my math was wrong last time.
All the attachment points are in for everything created so far (lights, doors, wipers, pant, bogies etc), and the only things left now, besides a little more tweaking, are the couplers, trip arm, and gangway. Then its off to the paint shed for some textures.
The actual models that will run in Trainz will then be created from this one. While that is happening, I can start testing the scripts, using this model as a test-bed to get everything working.
Andii06, has sent me the library I mentioned last time, which covers many of the features that I had planned, and has a really nice "properties" interface in surveyor, so I only have to write the code for a few special (and some surprise) features not covered by his library.
I also have to build an interior model for cab mode, which will be based on this interior, but with more detail (levers, buttons etc) and write a script for it. I also need to write a new library which will act as a communications channel between the interior and exterior scripts, so that if for example, you open a door in cab mode, you will see that door open in DCC mode as well.
The base Gmax model is getting really close to finished, but its also a very long way from being ready to upload the final variations to the DLS. Theres also a few other things to do. Since its my first train, I will need to create a driver, and anything else that may be needed. These could be reused in the future, but I have to create at least one, at some stage.
Yes, there is a reason for those extra attachment points above the pantograph :)
BTW: I finally figured out how to get large images into blogger... dont use Picasa :)
File Version: 341
Poly Count: 10,100
Monday, April 03, 2006
Tangara Progress
 Here is a shot of the other end of the base model for a change. Ive been working on the intercar gangway area. Its important to get this right as what I do here will appear on all variations of each car that will be created from this model.
Unfortunately Im kind of stuck trying to get my head around how it will work. Nothing major, just trying to get a picture of it spatially in my head (ie: in 3D).
What I want to do is have the gangway and coupler both attached to a dummy bogie attachment point so that they swivel as the train goes around a corner, keeping the gangways and couplers of inter-connected cars aligned. Because its so wide (almost the width of the carriage) the gangway will have to be carefully positioned so that it doesnt show through the interior walls when it turns.
I also want to animate it so that it retracts when the car is decoupled. I had always thought it retracted in a particular way, but I cant find any photograpic evidence to support that, so I will probably model it like the photos I have, which will mean that the animation will be slightly simpler. There are not a lot of photos around of decoupled Tangara cars, although I have found a few.
Having said last time that the front end was just about done, I noticed a problem with the upper section which led me to totally redo the rounded edges, both at the top, and at th bottom. I also noticed that the windows on the exterior are slightly out of alignment with the interior windows - probably as a result of the boolean operations to make the headlight, ditch light and marker light holes. I'll tidy them up once the body is done.
Im really trying to avoid using boolean tools now, and often cut holes by recreating whole panels from a few selected verticies and hand created polygons. I leave a bit of a hole and then later refine it into the shape I need. Not as fast as boolean, but it doesnt mess up other parts of the model.
Andi06 kindly offered the use of a library that he created for his AEC Railcars, so Im looking forward to incorporating that into the Tangara. Being new to Trainz Script (but not to programming) I was having a hard time setting up a structure that would be easy to maintain, so in addition to the code, this will help a lot with that. Many of his supporting utility functions will come in handy, as will a few others I have collected.
I was wondering about push buttons a while back, and today I discovered a couple of undocumented config tags in an Auran examle (the transporter turntable). From memory I think they were kind button_onoff and kind button_whilepressed. If they do what I am thinking they do, it will make the push buttons in the cab a lot nicer. I also have a couple of other ideas, including using animated levers and colision meshes to achive the same thing.
Current Version: 319
Poly Count: 10,400
86 Class Progress
 Because Ive been stuck on the Tangara, Ive done a little more on the 86 Class. Not much different really. Ive recently added the interior and last night I cut out the windows. The doors will be next, and then I can go around fixing a few things that the boolean subtract messed up.
Now that it has a few window holes its starting to look more like the real thing, but there are a few more pieces yet to be added.
File Version: 49
Poly count: 5500
Friday, March 31, 2006
Sun sets on Melbourne's 4D
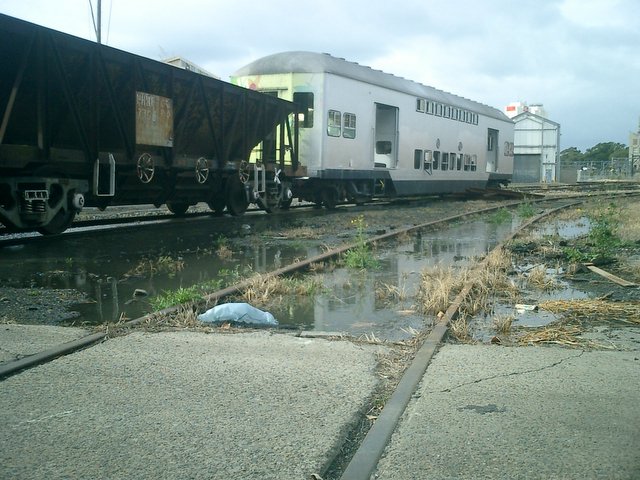
 Seen here enjoying its last sunset, the 4D was finally scrapped yesterday.
Despite the secrecy several photographers turned out, and posted their photos online almost immediately. A friend in Melbourne emailed me several links as they appeared, on various discussion groups, and it was almost like watching it happen.
You'll find the best pictures here, here, and here.
On the up-side, I now have more photos to use as reference, and now have the 4D covered from every angle (including shedding some light on a few Tangara mysteries)
Its sad to see it go, and it will be missed, but I will do my best to reproduce it in Trainz, even more accurately now than I had originally planned (since I now have better photos to work from).
Monday, March 27, 2006
Tangara Progress
 One good post deserves another - Many thanks to whoever left the comment about the digital ampmeter. That little piece of info reduced the number of animation frames required down to 50 - a much more managable number. I hadnt begun to think about how to build the ampmeter, but now it will be easier than the speedo.
Ive pretty much finished the front end detail on the base model, except for the coupler and train-stop trip. Since there are no textures yet I highlighted the destination board so that it could be seen. That whole header area is behind glass, which for now I simulated by making the glass object see through in Gmax. I still havnt put glass in the windows yet. All of the attachment points for the various lights are in place, but hidden in the picture.
Hmmm. The cab side doors seem to a be seperate pieces to the body. Perhaps they'll be animated. I sure hope so - that will depend on me figuring out how to pass messages between the script that controls the exterior and the one that controls the interior. Its not that hard, just a matter of getting the code right.
I started putting the exterior script together. The one for the Control Trailer will be more complex than the one for the Motor Carriage, so its a good place to start. Im currently working on melding all of the "Stage 1" features together, and will consider the more advanced stuff when that is done. Due to the amount of time it will take to get all of the features in my head working, I think I will release it in stages as well, rather than waiting until its all done, That way I will have more time to work out some of the more complex scripting.
I finally figured out an easy way to keep that front end flat, and since then I have been working mostly on the Tangara, alternating between the model and the script. Ive spent some time researching and coding, and its coming along slowly.
The next step is to work on the rear end detail, and gangway, and then the exterior will be just about done, then it will be back to the Interior for the cab details and creating the interior model to be used in Cab View.
I guess I should have captured that screenshot with the passenger side doors open.
File Version: 303
Current Polys: 10,100 (excl bogies)
I underestimated the polys required by the exterior detail and have crept a little above my self-imposed limit of 10,000. Im now conciously aware of every new poly that I create. I'll go over it soon and see if I cant remove a few, and there are not too many more to be added.
Saturday, March 25, 2006
Going Digital
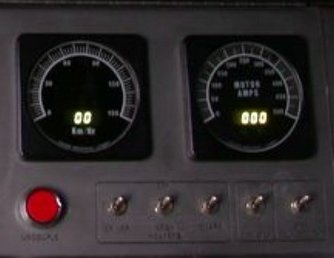 Whoever desgined the cab controls in Trainz, was clearly thinking of old fashioned analog gauges and toggle switches. Its dead simple to build a cab with these types of controls. Unfortunately our Tangara is a modern train, which uses digital displays and a lot of big round push buttons (as well as some toggle switches).
Trainz doesnt handle these well, and requires you to think of ways to make it do things that it was not actually designed for.
Well, Im excited. After a couple of weeks thinking about the problem, and several hours spent reading through old forum posts, the Content Creators Guide, and trying out a few ideas in Gmax, I think Ive finally cracked it. In theory anyway... I havnt tested my ideas in Trainz yet.
We know digital gauges can be done. There is an excellent range of payware locomotives that have them. Its just a question of how. I also got a hint from eldavo on how a big red push button might work in Trainz, and I will be trying that out soon(tm).
Essentially the gauges here are an analog/digital combo. The analog part is easy. The digtal part will require some work. Its basically animation - 150 hand built key frames (in the case of the speedo) Doh!!
That sounded hard until I realised the Ampmeter reads from 0 to 500! Doh!! Doh!! Doh!! I may cheat a little on the Ampmeter.
Getting them to work will requre some scripting, and I have been thinking about that too. The script for the Tangara control trailer is currently being built in my head, and its HUGE!. Hopefully in a few weeks, I can move it on to my computer, and free up some brain-space :)
Im also thinking of ways to make the TMS (Train Management System) computer work (or at least, appear to) and that thought process is coming along nicely - it will probably be done by texture replacement, like the external livery will (hopefully) be. I have a few other ideas brewing, and some of those will be a surprise (presuming they work).
For now, Im not planning on creating any ground-breaking technology such as refueling locos, coupling / air hose systems, or dynamic texturing libraries, and the like, (we all know the ones Im talking about)... but I do want to bring all of the existing (mostly seperate) features that we know about, together in order to bring the Tangara to life.
For example, the Tangara has (as most trains do) headlights and marker lights. It would be remiss of me not to script them, since we all know that this can be done and the scripts are available. We look forward to finding this feature in a new download. In fact, for me at least, it can be quite disapointing to download a nice looking locomotive, only to find that it doesnt have even basic features such as this. It all adds to the realism.
My wife already tells me the untextured static Gmax model "looks real" on occasion.
Bit I digress... Im not intentionally trying to build the hype around the proposed Tangara features, Im just sharing my thoughts. Its actually rather frustrating knowing that Im "this close" to starting to script all of the features together. The ideas are racing through my mind. It would be so nice to get it over with and move on, but that is probably a couple of months away, at least.
Im sure the wait will be worth it. Im also hoping that Auran will release SP1 soon, as part of the scripting requires a fix to the 2k6 decouple bug, so while we wait on that, I can continue to refine the Tangara. If it gets to the point where the Tangara is done, and SP1 is still pending, I'll work around it somehow.
No progress report as such (perhaps tomorrow) but the front end detail is almost done. The file version is up to 297, and Im thinking about starting on the rear end detail.
Actually.. I recently figured out that each file version represents about 30 mins to an hour's work (possibly more) so that may give you an idea of how much goes into one of these (and I still have the motor carriage to go, and at least 6 different versions of each to cover all of the feature / physical differences between the 3 types of Tangara sets that Im building)
Saturday, March 18, 2006
Tangara Progress
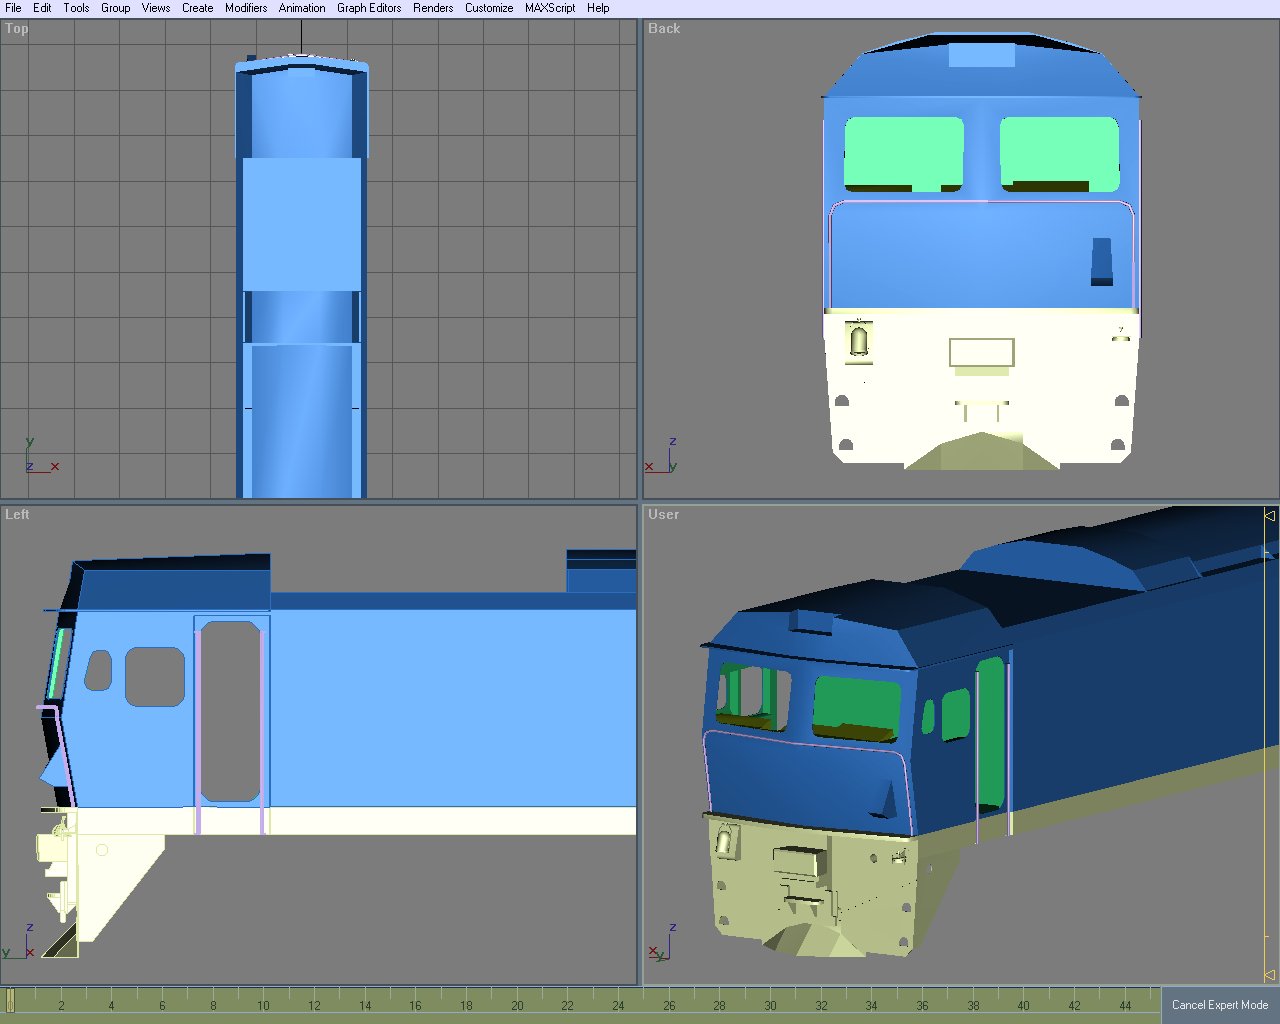
 This is without a doubt why I have been working on the 86 class a lot recently. Arrrgh! Those curved edges were frustrating!!
It was almost impossible to make the curved edge (all the way around) while keeping the front surface flat. A vertex even being out by only half a millimeter caused the uneven surface to reflect light in strange ways.
Due to the windows being cut out already, there are a lot of verticies on that front panel, and every time I chamfered the edges, they would move. I wish I had saved a screenshot of the bent front end so you could compare.
Finally I detached the front end from the rest of the model and cut it in half to reduce the area that I had to deal with. I set up a mirrored instance to complete the other half, so that any changes that I made one side, automatically happened on the other side too, and then I went around, vertex by vertex lining things up. I chamfered the edges one at a time (Each chamfer makes a new edge, there were four edges by the time I was done) and adjusted the verticies again after each chamfer. Finally I re-attached the front to the body, and welded everything together. A couple of tweaks later, and it looked like the picture.
I just hope it all holds together when I cut out the remaining holes (the one around the coupler is the big one).
So basically this week, a lot of time spent, but not a lot of progress. Still, its movement, and any forward movement is a good thing. You may notice a theme between this and the previous post. I guess the lesson to be learned is to cut out the holes LAST!! :)
The poly count is creeping up. My original estimate was around 8000. Im actively reducing polys as I go, and will try to keep it as low as possible. I also have to remember to move the cursor out of the way when I take the screen shots, to avoid getting tool-tips in the picture. Doh!
File Version: 276
Poly Count: 9200 (Excl bogies)
Thanks for the comments on the previous post. Its nice to know my work is on-target and is also being appreciated.
86 Class Progress
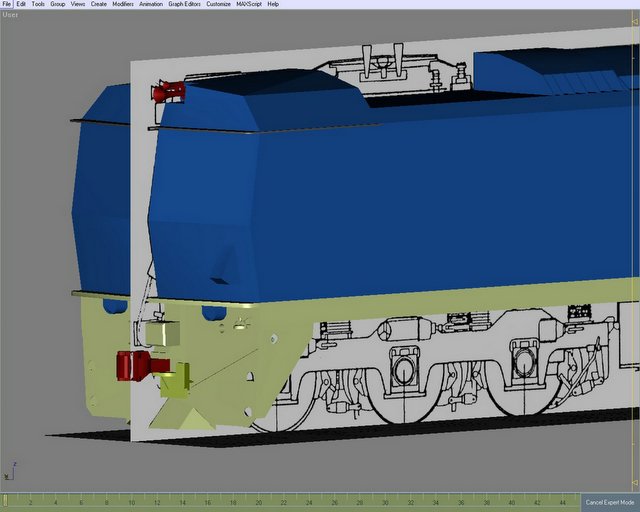 Well, I had planned to build this later, but since I have started it, I guess I should post progress reports.
Sometimes you just have to do certain things. Building the 86 class is kind of like that. I know I have other things that people are waiting on, such as the V Sets, but I cant just build things for other people - sometimes I just have to build things for me too, and this is one of those things. The V Sets should be the next to be started.
As I said before, im building half of the 86 class, and will be mirroring the other half. There are a couple of small differences between the ends, which I will tweak after mirroring, so as to retain the seperate No. 1 End and No. 2 End look and feel.
I have been concentrating on the yellow base and the end plate, and have just finished the Multiple Unit receptacles on this side. I still have to build the one on the other side which takes the cable from the other unit. I will be adding the cable later when I do the air hoses.
It took me a little while to get the "Roo Scoop" right, and properly integrated into the plate. (Hey, Im not an civil engineer, so I'll call the parts what I like :). The problem was that due to the foot-holes already being cut out there were a lot of verticies and faces to deal with... but its done now.
As you can see, my drawing has a lot of detail, especially for the bogies (which is unusual), but the one thing it doesnt have are dimensions. Luckily, I know the overall dimensions, and have a pocket calculator handy to work out the rest. The pantograph on the drawing, isnt very detailed but we have a few spares of the same type of pantograph at the HET workshops, so if I need some up close and personal detail, I have it covered, The 86 class also used another type of panto, similar to that on the Tangara model, so I guess I'll be borrowing from that one as well. I think these alternate pantos were field repacements.
The next moves from here will be to finish the end plate detail, and then think about cutting out the interior and windows / doors etc.
File Version: 41
Poly Count: 4200
Monday, March 13, 2006
Tangara Progress
 Ok, so its been a while since I updated this page, but I have been busy working on the Tangara and other things... I just havnt been writing about them.
So here is the latest picture of the base Tangara model. I have completed the interior (for the external view anyway) and Im starting to work on the exterior detail. I recently added the steps at the front (foot-holes) and as you can see, Im still finishing the ones at the rear.
Ive totally redone the door animation and completed all of the passenger side doors. The animation includes the mechanism and the twisting poles at each door. Its fairly simple, but there is a little detail that can only be seen through the windows on the opposite side... that should keep you busy.
Speaking of the doors, as you can see, Ive added the window panes. Still no textures just yet, which is why they appear solid. I'll add the windows on the body later. The next thing I have to work on is the front and rear end detail, such as the rounded edges, wipers, and emergency door handles at the front etc. Before I start on the wipers I will have to export the door animation so I can start on the wiper animation without the two of them clashing.
The last major component, which I havnt started on, is the pantograph. I still havnt decided whether to make one or just use an existing one. I'll probably make one. Its not that hard.
If you have followed this blog, you will know that Ive been working on the Tangara, on and off, since November last year - thats almost six months. After a while, your brain tends to go numb due to looking at the same verticies again and again, and you need to work on something different for a while. So far, I have been doing a few smaller projects occasionally to get away from the Tangara when I need to.
I really should finish the buffer stops that I started on ages ago, but I have been thinking more and more about the 86 Class electric locomotives, which have always been my favourite. Several weeks ago, I walked down to Eveleigh and photographed the four 86 Class locos there since this could be my last chance to get detailed photos of them... who knows when Railcorp will move them, or return them to Silverton.
Last week I went down to the ARHS Research room (Did I mention that I love living so close to Eveleigh / Redfern?) and picked up a couple of drawings and took some hires scans. Then I fought with Gmax for a few days until it finally gave in and showed the scans in detail (instead of blurred as it had been doing). The original idea, as mentioned earlier, was just to set up a base to be used later.
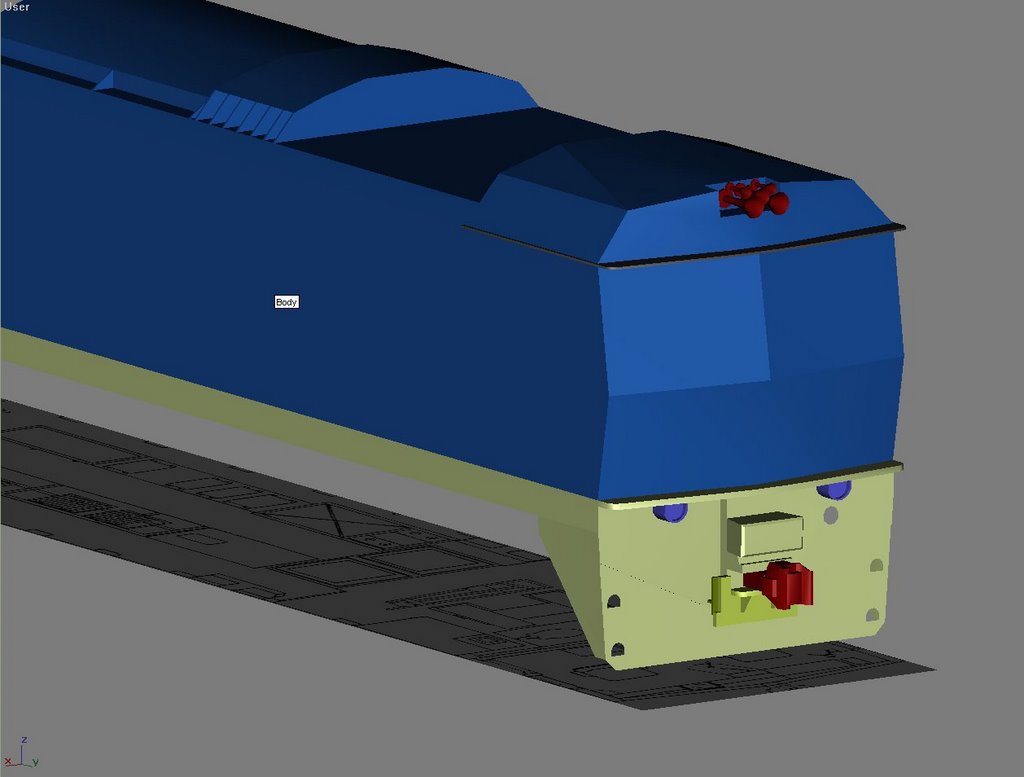 So much for that idea. Surprisingly I havnt really spent a huge amount of time on it, though there have been a few bits that took a lot longer than they should have, such as the various holes which had to be cut out - they were a real pain. The good news is that since the 86 Class are double ended, I only have to do them once. Im building half a locomotive, and will simply mirror it later to create the other half.
For now, Im alternating between the 86 Class and the Tangara. If you look at the file version of the Tangara (below) and compare it to previous posts, hopefully you can see that it is still progressing. I can't wait to get the control trailer into Trainz for a test run, and then start on the scripting while I create the motor carriage from the base.
I have plans for quite a lot of scripting... hopefully Trainz will be co-operative. Im planning some unique features as well as building on existing assets to include some of the features found in the better models out there. (ie: things like driver and lights changing ends, to name an obvious one). I can't tell you too much about the unique features, because I dont want to spoil the surprise... Lets just say that Im not aware of any other assets that will do what Im thinking of.
Its been a long wait, and there is still more to be done, but I plan on making the wait worthwhile.
Tangara Poly Count: 8995 (excluding bogies)
File Version: 270
Thursday, March 02, 2006
Quick Update
Just a quick update for now. For various reasons I havnt done much on the Tangara over the last week or so. I did do a little bit of structural reorganisation, but nothing that can be seen. I have realised that to redo the door animation the way I wanted, I will have to lower the ceiling in the vestibule, so that will be the next thing to be done. Other than that, I would say that the interior is complete and just needs texturing. After the doors will come the missing exterior detail, windows, and textures.
My interest in the 86 class has been increasing recently, so I tried to set up a basic environment in Gmax for it, but I have been having trouble getting the scalebox texture to map properly. Textures are not my favourite part of Gmax, and it makes me wonder if I wont also have similar problems with the Tangara textures. No matter what I try, my crisp clear scale drawing comes out blocky and blurred. I know Im missing something.
The Auran forums are frustrating me. I make one comment, which people react to without thinking about, and all hell breaks loose. I explain what I mean (requiring a much longer post) and they go.. "oh, now I understand" but then start picking on one small point in the explanation. Then while Im trying to clarify that, Auran come along and close the thread. That is what is frustrating me the most.
So much for free speech, or valuing the diversity of others opinions. Auran just take their bat and ball and go home if they dont like where a thread is going. Ive felt the same about an earlier thread which they closed, which I did not even participate in.
Peoples reactions and Aurans childish thread closing, make me wonder if I will ever bother to post there again. For the most part, Ive tried to be helpful, and most people are friendly, but there are a few that really just dont get it.
Tuesday, February 21, 2006
Last of the 86 Class Electrics
So much has been happening lately. Tangara Progress is in the third article below.
 On Sunday I went to Milsons Point to photograph the special tour train organised by 3801 Limited and the ARHS. It was hauled by an 86 Class electric, and went from Central, to Kiama, to Newcastle, and return.
With the withdrawl of the 86 class, this is now the last working passenger train hauled by these locomotives. The previous "last train" was also a special tour, hauled by 8646 for SETS just after the 86 class was decomissioned (8646 was on loan from Pacific National at the time).
This latest train was hauled by 8644, which surprised me a little. I was expecting to see 8606, owned by SETS, or 8646, now owned by ARTM, but 8644 is one of the four Silverton locomotives that are currently parked at Eveleigh. I have mentioned these, and posted a photo here before. Im guessing that 8644 was the lucky one as it was the last to be parked there, and so was the easiest to get out.
I took a few photos as the train came over the bridge, and also as it went through the station. It was completely full. Despite my interest in the 86 class, I decided not to be on this train since you dont really get much of a view of the locomotive from the passenger cars behind it, but that didnt seem to deter these passengers. Quite a number of them were packed into the small paltform area at the rear of GMS1, the last car of the train. This car is on loan to 3801Ltd, and is obviously very popular (see their site for more details about GMS1),
The photos that I took are still being developed, however my wife came along and so I got her to take a few snaps with her digital camera. I'll add one of those to this post, just as soon as she has finished watching Desperate Housewives on DVD. :)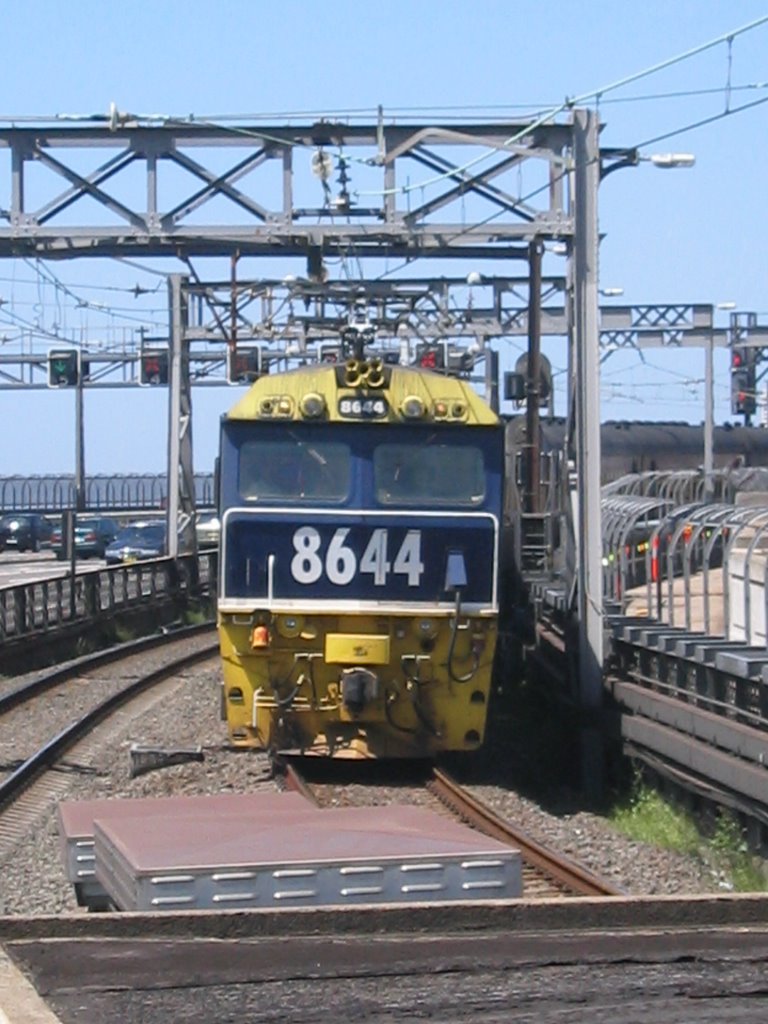
The Real Redfern Workshops
I mentioned that I joined HET recently. Having been approved and recieved my members card, I wandered off down to the Redfern Workshops to meet the people. It was a quiet day so I basically just met the General Manager and a few other regular people (a couple of directors and members) and they were all really cool.
I had the grand tour, and was surprised at exactly what they have stored down there... I think its one of RailCorp's greatest secrets, but unfortunately with the site under threat of redevelopment, its a secret that is not doing rail fans any service. People should know whats down there, otherwise the assumption is that its just a bunch of empty old buildings, taking up space. Its far from it - In the 15 track, two building workshop facility there is not a single space where another carriage could be parked. The place is completely full of antique trains in varying states of restoration. They even have a couple of Tangara's in there (well... models of Tangaras anyway hehe).
I think its a big problem. Developers see what looks like an empty site and come up with a big plan. The councils and government representatives assume the place is abandoned and are keen to do something to make use of the empty space. Its not empty! My personal opinion is that it should be turned into a rail museam. It certainly has enough exhibits inside!!
Its the home of W3 and F1, the last two working red rattler sets in Sydney. I got to sit in the cabs of both so that they could show me the differences between them. The W set cab is slightly similar to the S set cabs. (it seems SRA carries designs over from one model to the next - indeed, many of the physical features of the Tangara interior can be traced back to the original Tulloch double deck cars)
Theres a few other red rattler carriages - including one that was part of the first train across the Harbour Bridge in 1932, and some of the earlier wooden electric carriages with spoked wheels. They have the first ever Tulloch Double Deck car that was built. Theres a U-boat (the old silver interurban trains before the V sets) and a 900 series rail car, as well as several decomissioned passenger carriages from more recent diesel hauled services on the Broken Hill line, and lots of other stuff as well, including a few maintenence trikes.
Im sure I will be down there a lot, and will try to get a few pictures to post here. My first job when I go back there will be to help restore some office space upstairs and set up a computer system for them. Later I will be working on other restoration projects, and helping to prepare the W and F sets for use occasionally.
Tangara Progress
 So... How many handrails are there in a Tangara Control Trailer? I bet you really want to know. The answer is 22. I didnt believe it either - until I built them all.
There are several different types, depending on the location. For each type, I had to create one, and then copy it to the other positions where this type is found. That wasnt so hard. The hard part was doing the center handrail on the stairs - you know... the one that starts on the upper deck and twists and turns its way down to the lower deck. It started out as two different handrails (one from the upper deck, and one from the lower) with the ends cut off, and then I had to create a spline for the twisty bit in the middle which joins them together. Finally I then had to loft the spline to make it the right thickness, and then join the three pieces together. It was a real pain, but it turned out all right.
Ive noticed a few variations on the different Tangara trains that I have been catching recently. I have tried to build a generic impression of what I think of as a Tangara. This includes the "monkey-bars" that are progressively being removed from the vestibules in favour of a safer, simple, pair of vertical poles. I have seen quite a few people wipe themselves out on those older style bars which hang from the ceiling but dont reach the floor. I also noticed that some of the original cars have flat handrails, covered in black plastic tubing on the stairs, but I have stuck with the simple rounded chrome rails that Im so used to.
Ive added some other interior detail, and Im about to re-animate the doors (the final version) before beginning on the exterior detail.
As I predicted, the poly count has shot way up with the addition of the seats and rounded hand rails, but I was careful to reduce the poly count on the rails (I could do more if I wanted to spend the extra time on it - but Im over it). Even so, the total poly count (excluding bogies) still comes in at about 8000 as I had estimated earlier, so Im happy with it. The final detail will see that creep up a little, but I can live with that.
Oh... and you can see the bogies in the picture... I was kidding before when I said I wasnt going to show you. They could do with a little more detail (which I might add) but they're good enough, and currently about 2400 polys each. I blame the poly count on the rounded surfaces of the frame :)
Current poly count: 8400
File version: 235
Monday, February 13, 2006
Right-handed Train Stop released
Last week I had a request for a right-hand version of the train stop for use in the UK, specifically the London Metro and Underground. I hadnt thought about a right-hand version, since ours are on the left, and to be honest, I have no idea where else they might be used.
It took me about an hour to make the nescessary changes, test it, and send it to the download station. It should be approved in a day or so - look for "UK Train Stop" as the asset name.
It took me about an hour to make the nescessary changes, test it, and send it to the download station. It should be approved in a day or so - look for "UK Train Stop" as the asset name.
Subscribe to:
Posts (Atom)